I've been working on some smaller parts lately.
Don't feel very inclined to continue working on the body, although I'm nearing the point where I will have to pick that up again.
Apart from the smaller parts, I've also been doing some work on the floor.
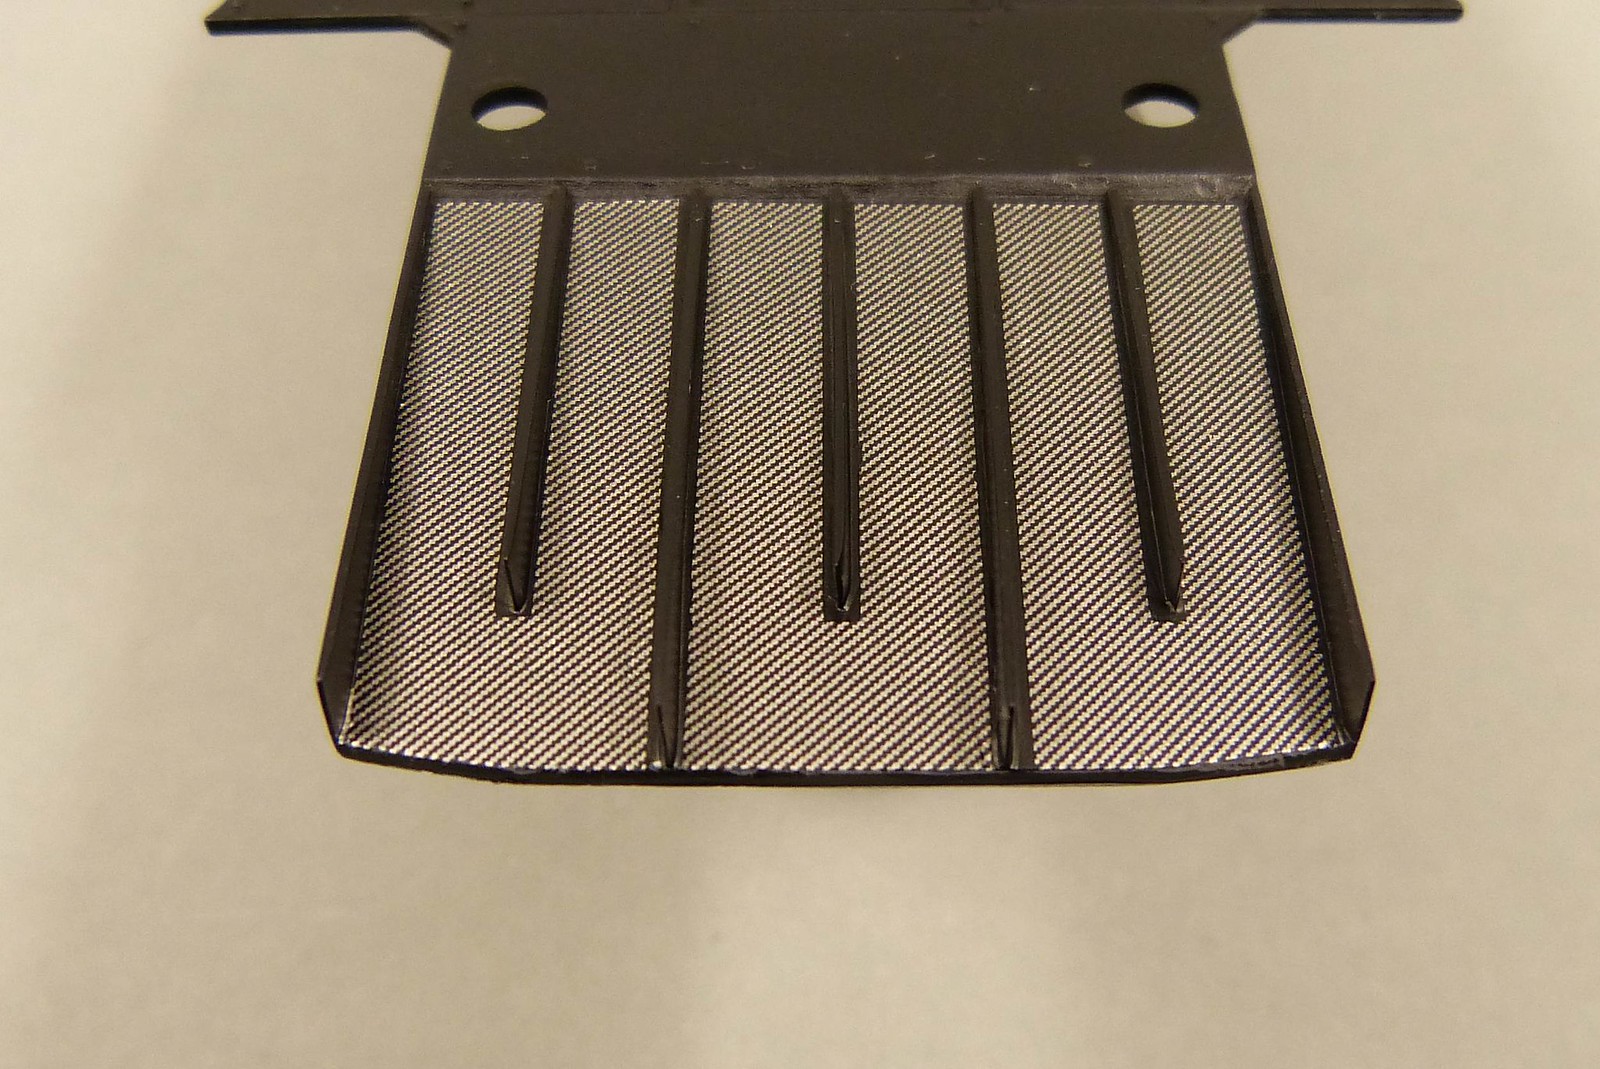
Before I painted the floor, I made a few templates for CF decals. Revell provides a CF decal for the upper (and most visible) side of the diffusor, but omitted the CF decals for the bottom of the diffusor.
Checking my reference images I noticed that the underside also has a carbon-fibre pattern.
So out came my Scale Motorsport CF decal collection.
I chose decal 1020 from Scale Motorsport for this. The pattern resembles the pattern of the Revell decal the most.
I only noticed that the SMS is a lot brighter so I will need to tone it down a bit.


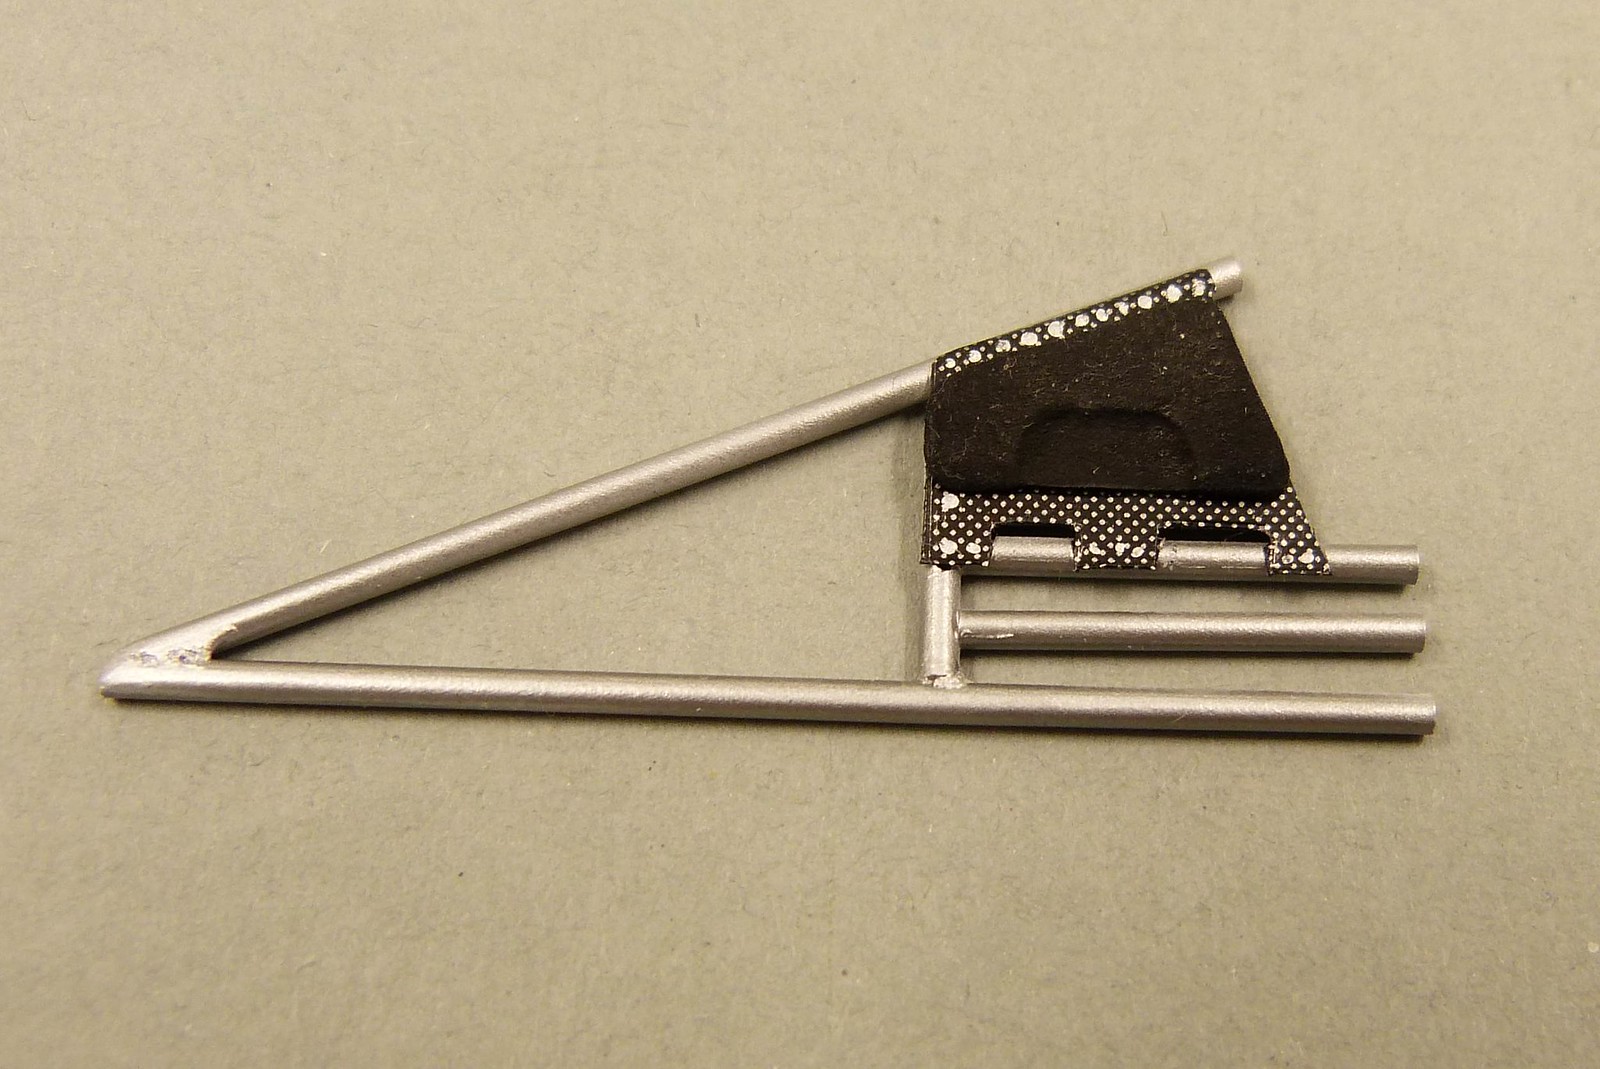
In the meantime I also finished the extra piece of rollcage with the headrest.
For the headrest-panel I also used SMS CF decal.
But this time I opted for 1424.
I glued the headrest in place and also painted on the bolts with which the panel is attached to the rollcage. I'm not sure what to think of the "bolts", but I think I'll leave it this way, as it is hardly visible anyway once the body is mounted to the floor...
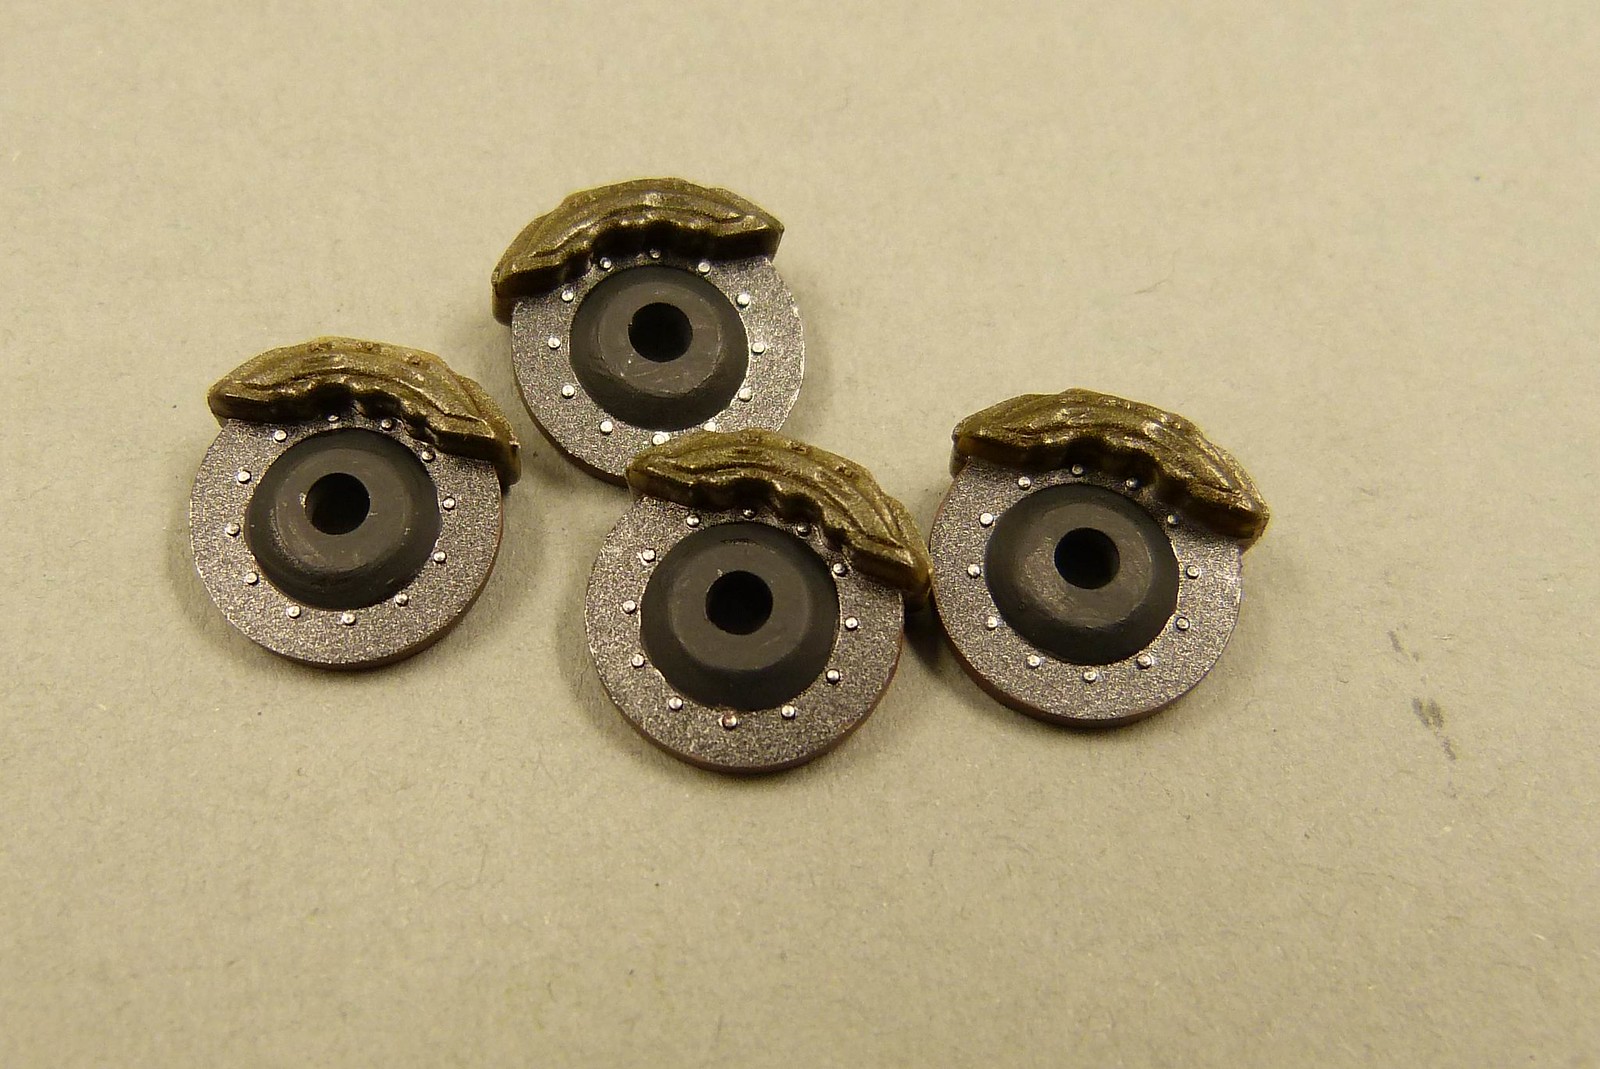
The brake discs have been finished too.
I didn't follow the colour indications by Revell but used my own judgement based on the reference images I found (mainly on www.palmeter.com).
The discs themselves were painted Tamiya XF56 (Metallic Grey). The centers received a custom mix of 60% 36108 (flat black) and 40% 36169 (granite grey), both Revell Aqua Color.
The bolt heads received a bit of aluminium (Revell Aqua) and the calipers were painted gold (also Revell Aqua). This last colour wouldn't cover the underlying XF56 completely. But I actually like the effect.
I'm happy with how they turned out, although all of that painting won't be visible anymore once the wheels are on.
I also finished the piping from the engine.
A nice wash to dirty things up a bit will follow, once everything is glued in place.

The engine is also taking shape.
A few parts need an extra lick of paint and there are some decals still to be applied. And also the engine will receive a wash.
As with the body and floor, the engine in the kit isn't actually the engine of the Le Mans 2003 car.
The engine has more in common with chassis no. 004, whereas the 2003 Le Mans cars were chassis no.'s 008 and 009.
Below is an image depicting the differences in the engines.
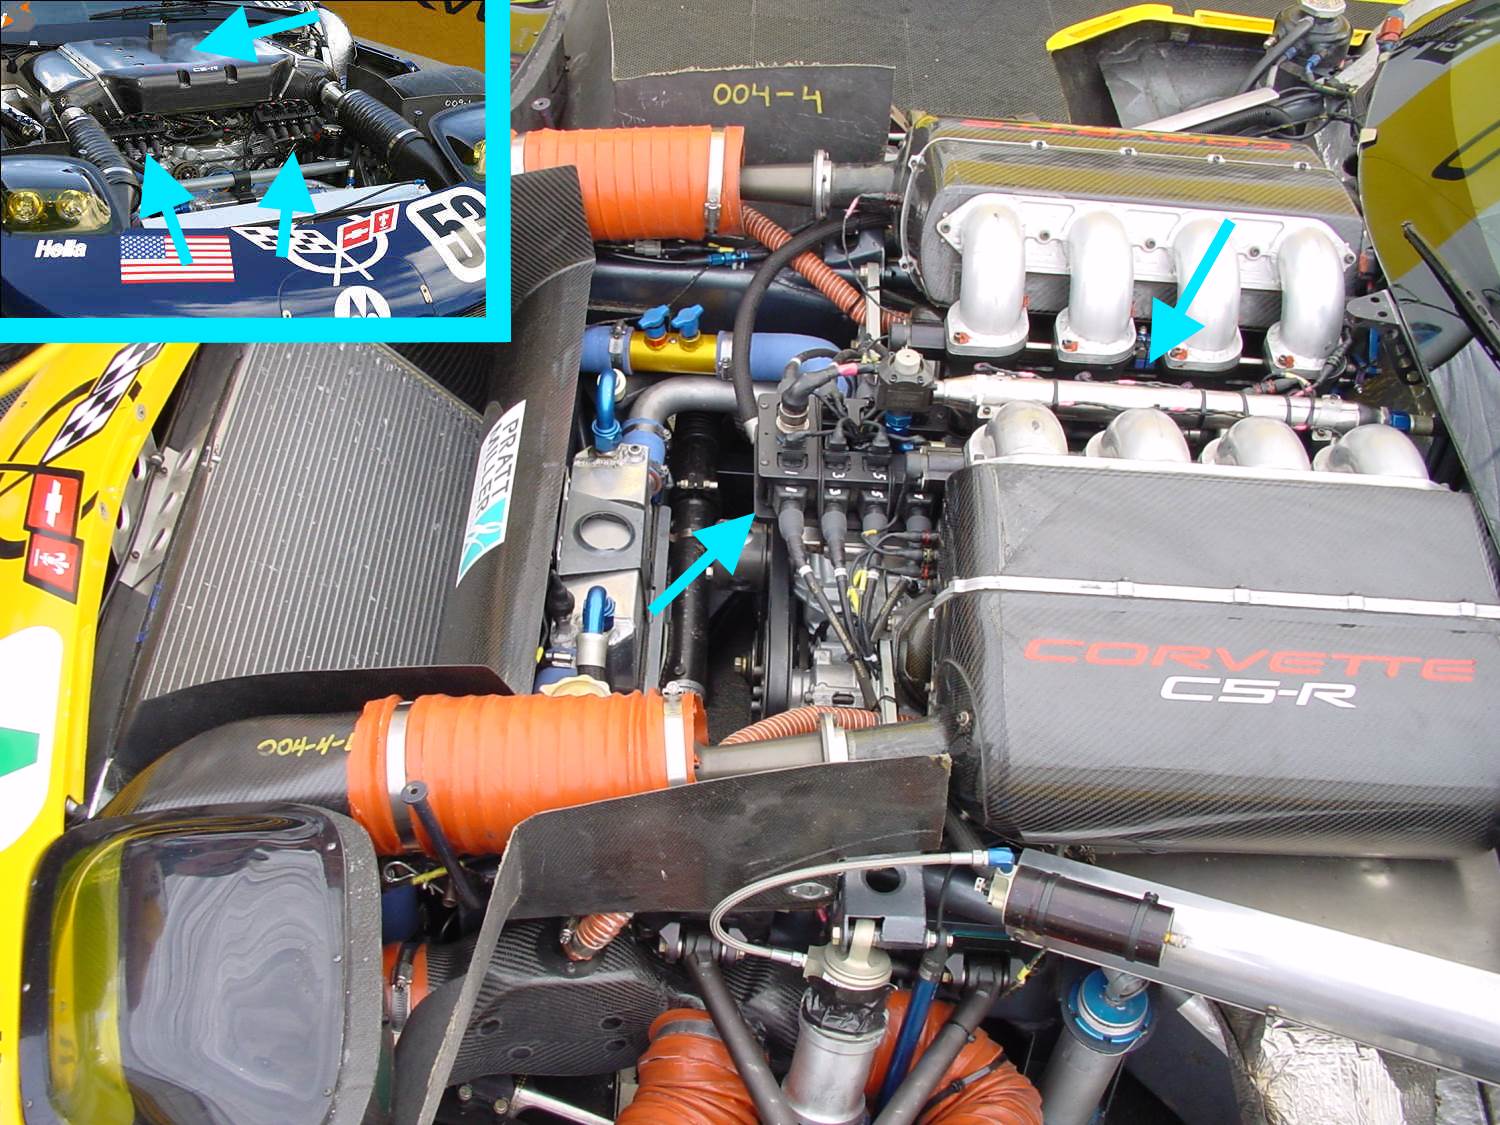
Painting instructions from Revell aren't really spot-on, so I'll be drawing from the 004 engine in the picture above.
I also started applying the provided decals.
The quality of the decals is absolutely perfect. The size however and the breakdown of the decals could be improved upon.
The decals for the cam covers are a tad too big and won't conform to the shape of the cover easily. Even with the use of setting solution. Not such a big deal as these won't be visible under the intake manifold anyway.

The decals for the inlet manifold are quite big and one-piece items. Quite difficult to get them to conform to the complex shape of the part.
It took several applications of decal softener and the careful wielding of a knife to get the decals to lie down good enough.
Revell rates this kit as a skill level 4, but 5 would have been more appropriate. This is not a kit for a beginner...

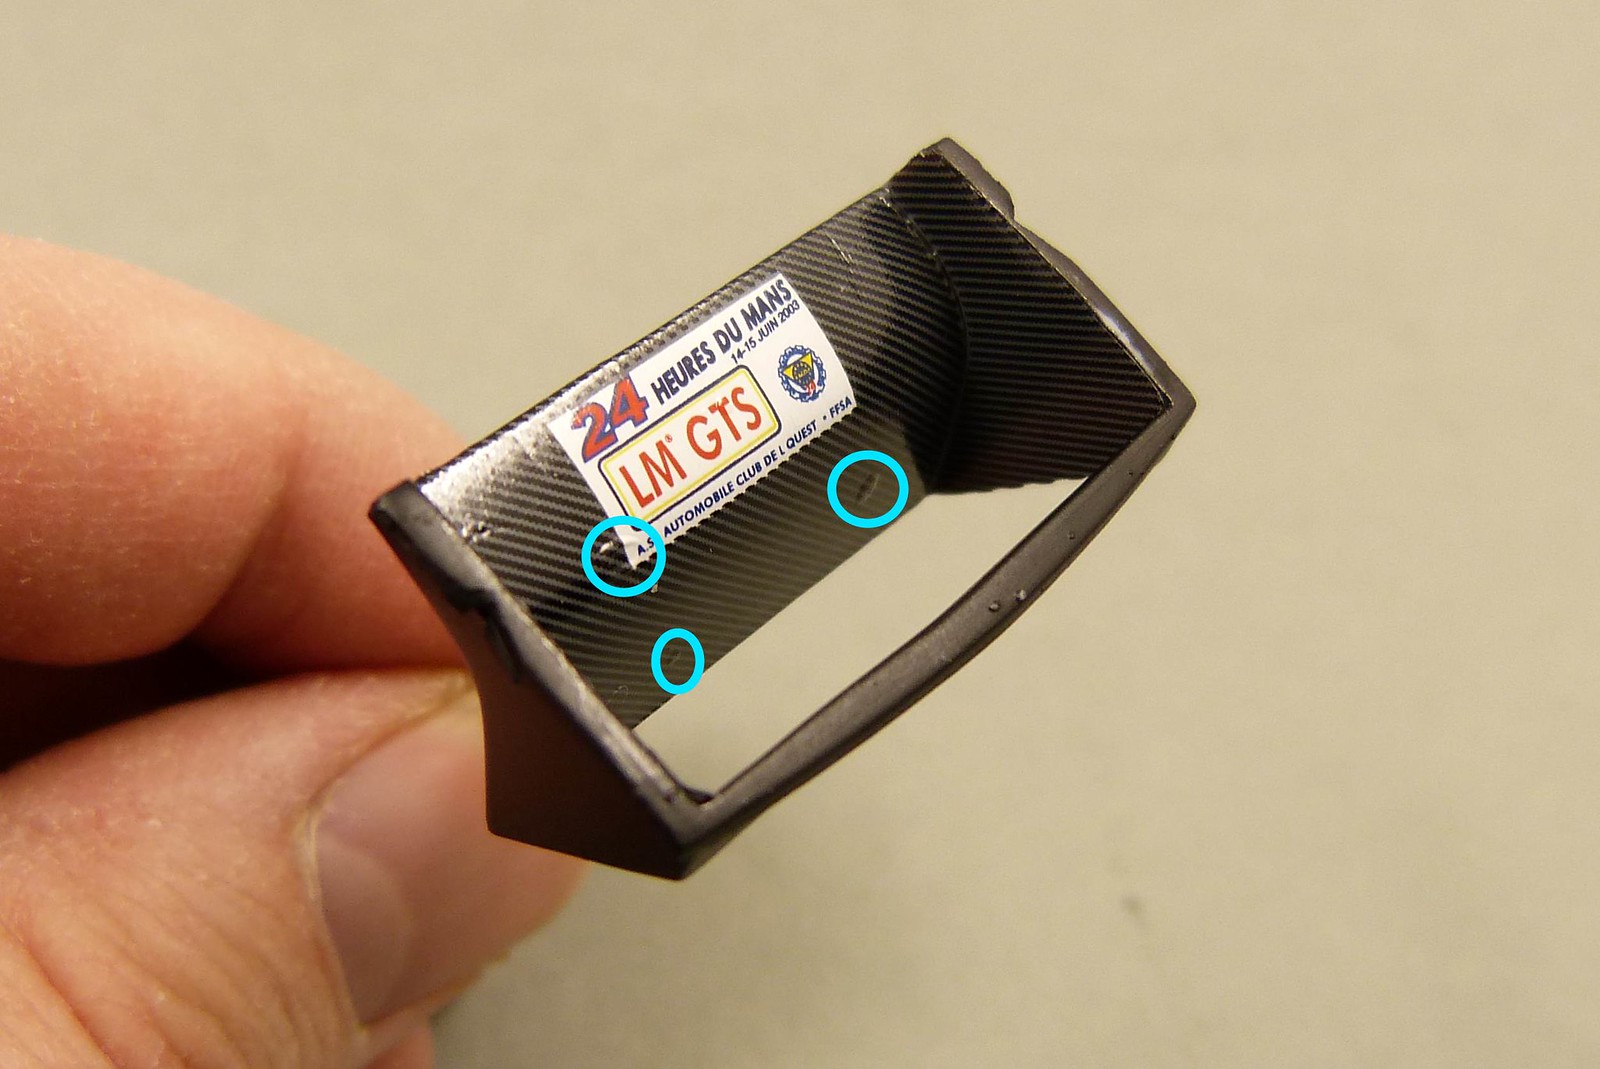
The hot air outlet for the bonnet is finished too.
I must say that I am pleasantly surprised by the performance of the Revell decals. I used Micro Set and Micro Sol from Microscale Industries during decal application. Good quality decalsheet by Revell.
Sadly I didn't rub down the decal well enough, so a few air bubbles have been trapped under the decal.
And I had a hell of time getting rid of them, but in the end I managed it just fine.
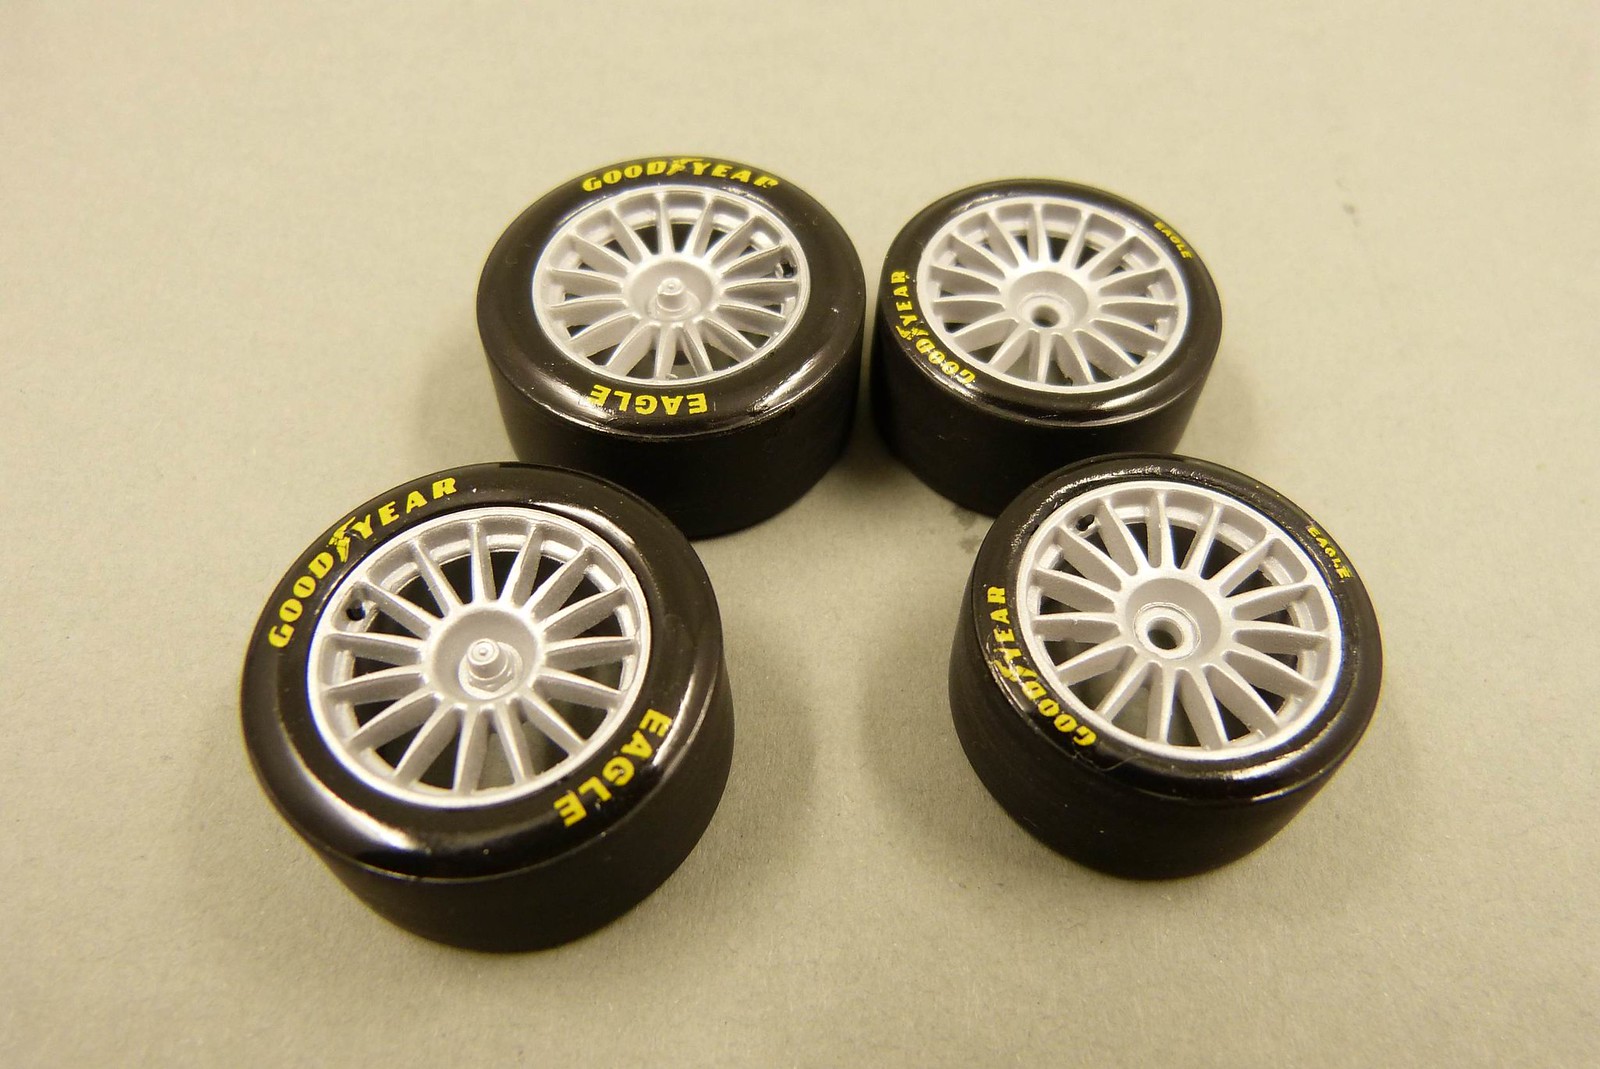
I've also been taking on the wheels. Good Year decals needed to be applied.
Before applying any decals I brushed a coat of gloss clear (from the Revell Aqua Color range) onto the side of the tires.
Next I cut out the appropriate decals, using the reference images as a guide to select the correct size.
Applying the decals was a different matter. When testfitting I already noticed that the lettering wasn't curved enough, so I already suspected that applying them would be a bit tricky.
In the end it didn't turn out half bad. I had to do several decals over because I didn't manage to get them to the right place before they stuck too hard to the tire.
For some reason the lettering for the "eagle" decals wasn't italic as it should be. No deal breaker, and if you don't know, you probably won't notice it...
Don't feel very inclined to continue working on the body, although I'm nearing the point where I will have to pick that up again.
Apart from the smaller parts, I've also been doing some work on the floor.
Before I painted the floor, I made a few templates for CF decals. Revell provides a CF decal for the upper (and most visible) side of the diffusor, but omitted the CF decals for the bottom of the diffusor.
Checking my reference images I noticed that the underside also has a carbon-fibre pattern.
So out came my Scale Motorsport CF decal collection.
I chose decal 1020 from Scale Motorsport for this. The pattern resembles the pattern of the Revell decal the most.
I only noticed that the SMS is a lot brighter so I will need to tone it down a bit.
In the meantime I also finished the extra piece of rollcage with the headrest.
For the headrest-panel I also used SMS CF decal.
But this time I opted for 1424.
I glued the headrest in place and also painted on the bolts with which the panel is attached to the rollcage. I'm not sure what to think of the "bolts", but I think I'll leave it this way, as it is hardly visible anyway once the body is mounted to the floor...
The brake discs have been finished too.
I didn't follow the colour indications by Revell but used my own judgement based on the reference images I found (mainly on www.palmeter.com).
The discs themselves were painted Tamiya XF56 (Metallic Grey). The centers received a custom mix of 60% 36108 (flat black) and 40% 36169 (granite grey), both Revell Aqua Color.
The bolt heads received a bit of aluminium (Revell Aqua) and the calipers were painted gold (also Revell Aqua). This last colour wouldn't cover the underlying XF56 completely. But I actually like the effect.
I'm happy with how they turned out, although all of that painting won't be visible anymore once the wheels are on.
I also finished the piping from the engine.
A nice wash to dirty things up a bit will follow, once everything is glued in place.
The engine is also taking shape.
A few parts need an extra lick of paint and there are some decals still to be applied. And also the engine will receive a wash.
As with the body and floor, the engine in the kit isn't actually the engine of the Le Mans 2003 car.
The engine has more in common with chassis no. 004, whereas the 2003 Le Mans cars were chassis no.'s 008 and 009.
Below is an image depicting the differences in the engines.
Painting instructions from Revell aren't really spot-on, so I'll be drawing from the 004 engine in the picture above.
I also started applying the provided decals.
The quality of the decals is absolutely perfect. The size however and the breakdown of the decals could be improved upon.
The decals for the cam covers are a tad too big and won't conform to the shape of the cover easily. Even with the use of setting solution. Not such a big deal as these won't be visible under the intake manifold anyway.
The decals for the inlet manifold are quite big and one-piece items. Quite difficult to get them to conform to the complex shape of the part.
It took several applications of decal softener and the careful wielding of a knife to get the decals to lie down good enough.
Revell rates this kit as a skill level 4, but 5 would have been more appropriate. This is not a kit for a beginner...
The hot air outlet for the bonnet is finished too.
I must say that I am pleasantly surprised by the performance of the Revell decals. I used Micro Set and Micro Sol from Microscale Industries during decal application. Good quality decalsheet by Revell.
Sadly I didn't rub down the decal well enough, so a few air bubbles have been trapped under the decal.
And I had a hell of time getting rid of them, but in the end I managed it just fine.
I've also been taking on the wheels. Good Year decals needed to be applied.
Before applying any decals I brushed a coat of gloss clear (from the Revell Aqua Color range) onto the side of the tires.
Next I cut out the appropriate decals, using the reference images as a guide to select the correct size.
Applying the decals was a different matter. When testfitting I already noticed that the lettering wasn't curved enough, so I already suspected that applying them would be a bit tricky.
In the end it didn't turn out half bad. I had to do several decals over because I didn't manage to get them to the right place before they stuck too hard to the tire.
For some reason the lettering for the "eagle" decals wasn't italic as it should be. No deal breaker, and if you don't know, you probably won't notice it...
Comments
Post a Comment