The interior is coming along quickly now that I have (finally) finished the seat belts and the safety net.
There's only one part I need to scratchbuild now and that's the safety net at the driver's door.
Building up the interior didnt'go without a hitch. My patience and steady hand was tested almost to the limit.
When adding the left side of the roll cage I also had to fit the scratchbuilt piece of rollcage I made.
To say that this went smoothly would be lying. A lot of fiddling, some slight swearing, and a few beads of sweat were all in order here.
Problem was that the 2 shoulder straps of the seatbelt were already attached to the roll cage which made handling the roll cage a bit of a challenge.
Apart from that it appeared that the roll cage didn't quite fit, so I had to trim it in several places to get it to fit properly.
In the end it worked out though.
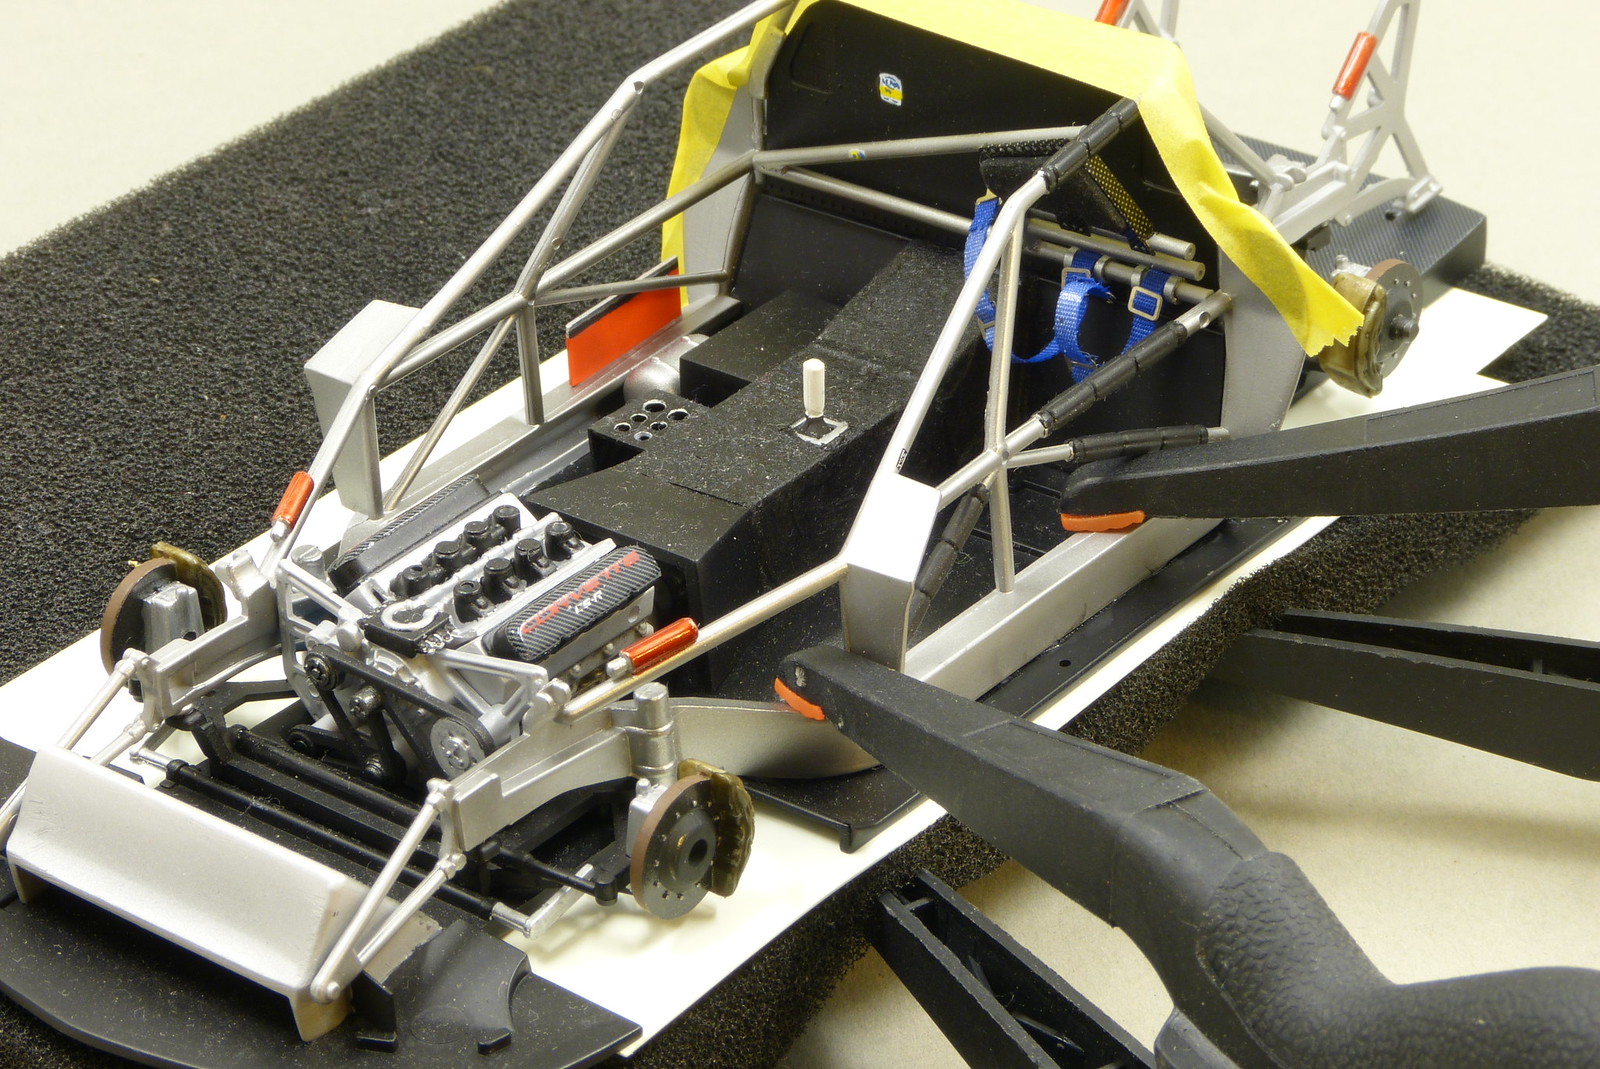
I deviated slightly from the instructions here, because Revell would have you place the seat first and than add the left side of the roll cage.
Because I had added the seatbelts to my extra piece of roll cage I was afraid that the belts would get tangled, so I decided to add the seat after fitting the roll cage.
With another nailbiting session of fiddling around I managed to get everything the way I intended...
Phew.
I had to use some glue to get the seatbelts to stay put, but it looks good now.
Next up was the safety net which could now be added.
Compared to the above, this was quite relaxed, although still a bit fiddly.
Only problem here is that the masking tape is quite inflexible and is hard to shape into the desired jumble of netting...
A bit of glue and tape did help here.
There's only one part I need to scratchbuild now and that's the safety net at the driver's door.
Building up the interior didnt'go without a hitch. My patience and steady hand was tested almost to the limit.
When adding the left side of the roll cage I also had to fit the scratchbuilt piece of rollcage I made.
To say that this went smoothly would be lying. A lot of fiddling, some slight swearing, and a few beads of sweat were all in order here.
Problem was that the 2 shoulder straps of the seatbelt were already attached to the roll cage which made handling the roll cage a bit of a challenge.
Apart from that it appeared that the roll cage didn't quite fit, so I had to trim it in several places to get it to fit properly.
In the end it worked out though.
I deviated slightly from the instructions here, because Revell would have you place the seat first and than add the left side of the roll cage.
Because I had added the seatbelts to my extra piece of roll cage I was afraid that the belts would get tangled, so I decided to add the seat after fitting the roll cage.
With another nailbiting session of fiddling around I managed to get everything the way I intended...
Phew.
I had to use some glue to get the seatbelts to stay put, but it looks good now.
Next up was the safety net which could now be added.
Compared to the above, this was quite relaxed, although still a bit fiddly.
Only problem here is that the masking tape is quite inflexible and is hard to shape into the desired jumble of netting...
A bit of glue and tape did help here.
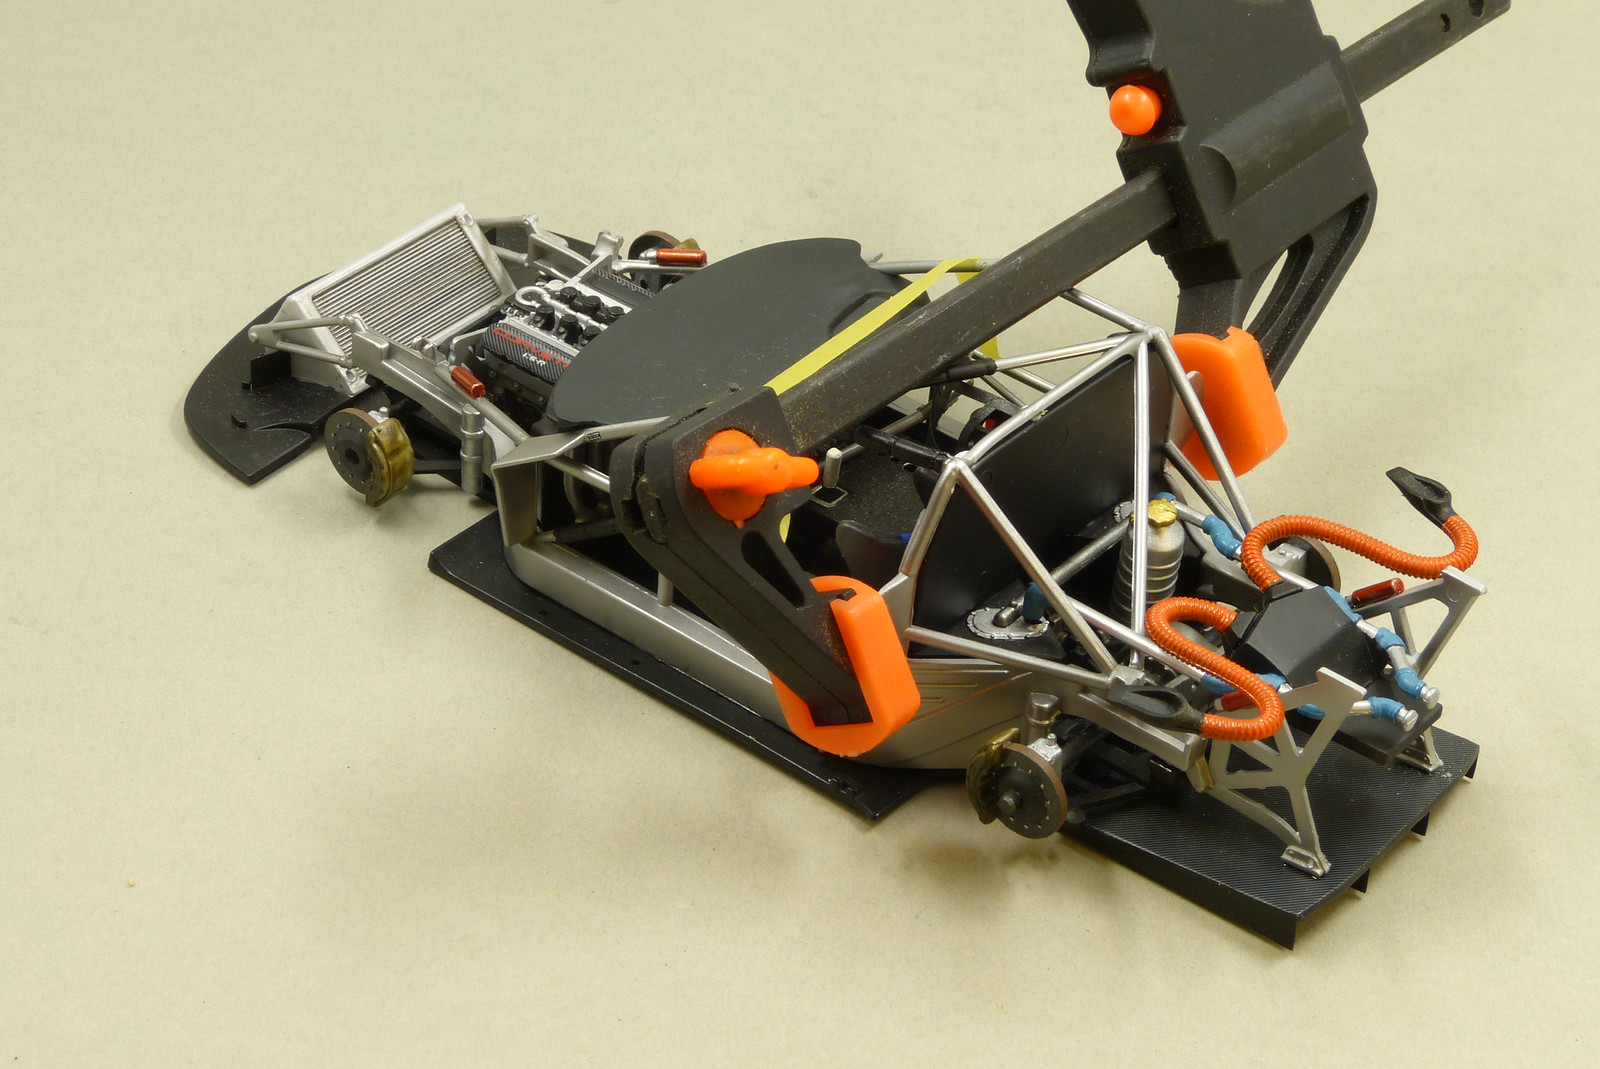
On the passenger side I added the electronics box. I had to trim and bend some of the cables to get it all in, but it worked out allright.
Before I fitted the fuel hose I went for a dry fit and put the body onto the chassis (this time without dropping it...) and noticed that the position I was planning to use was a bit too low.
Luckily I noticed this in time and glued the hose at the correct spot (with some CA glue).

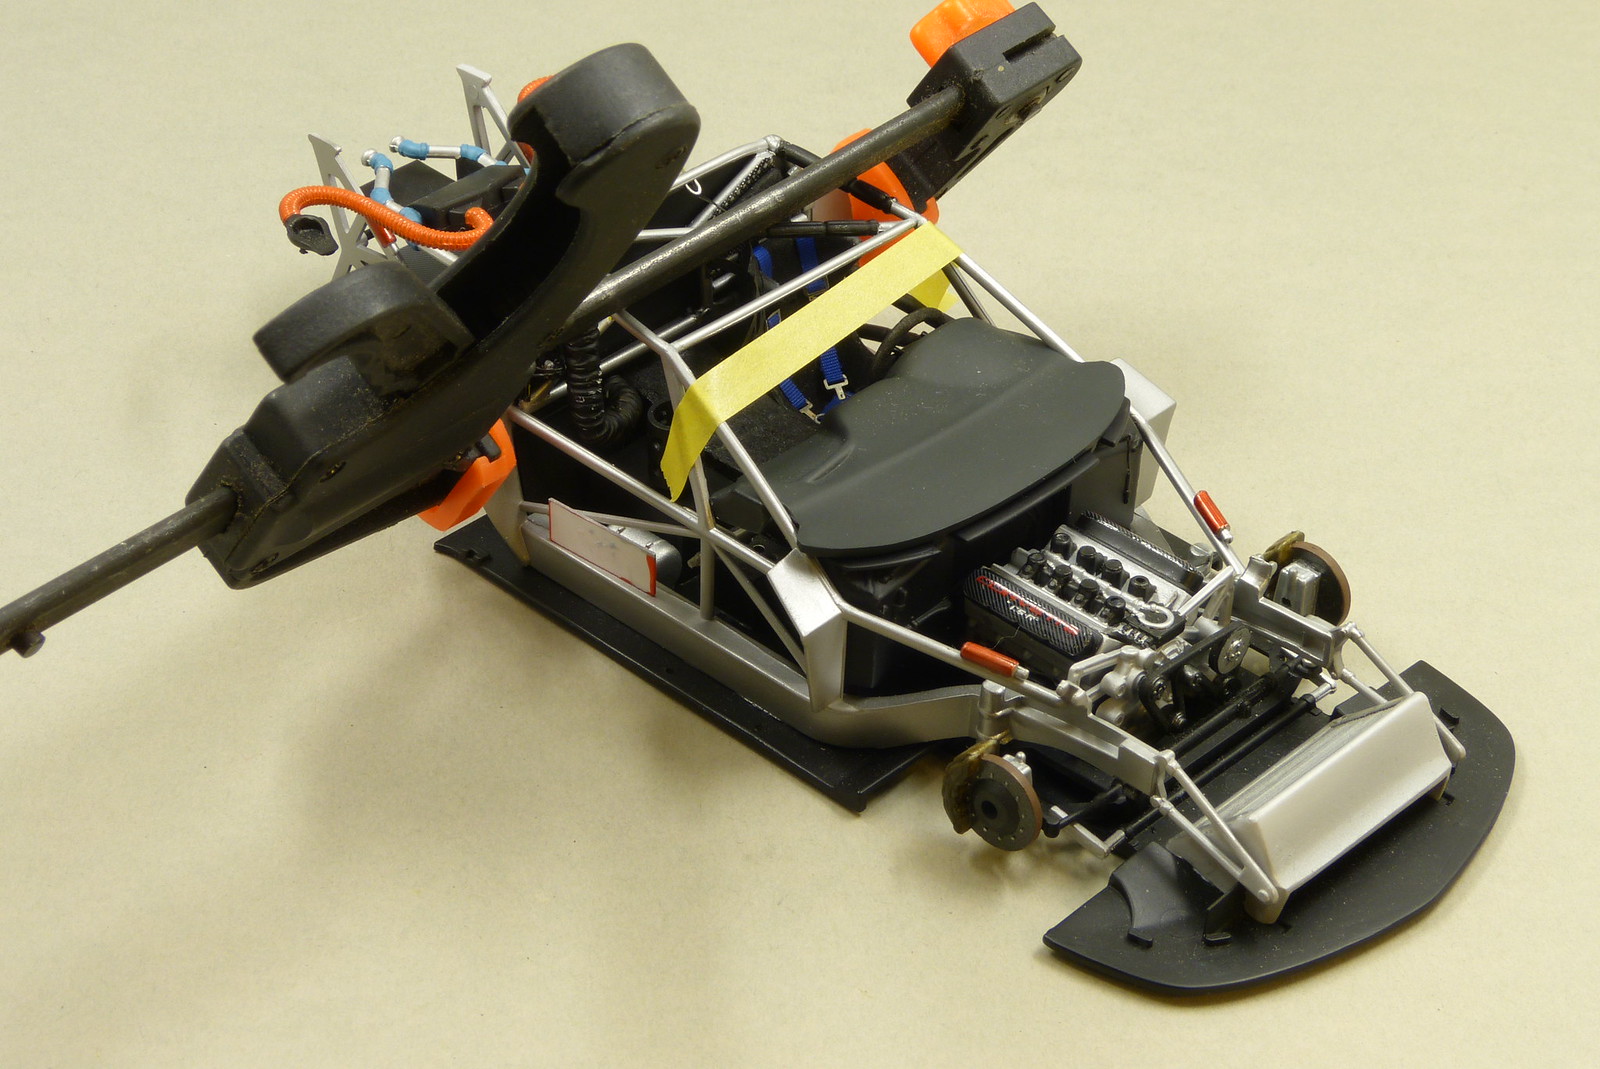
The interior is now quickly nearing completion.
Now I could also continu with the regular assembly instructions from Revell.
Although the instructions are not always that clear and obvious.
In step 9 you are required to glue the left side of the roll cage to the floor.
And several steps down (11, 13 and especially 14) you'll have the flex and pry the roll cage halves apart to fit several parts in between them.
That's when one of the glue points (luckily only on the front suspension) broke loose. This was easily fixed however, so no harm done (apart from a little swearing on my part).
I've also been working on the body the past weeks. After the spotrepair I had to perform in my last update I slightly polished the repainted section to make the body ready for the decals.
Before adding the decals though I decided to add the tow hooks to the car.
Revell does provide the decals to mark the position of the tow hooks, but doesn't provide the actual tow hooks.
To that end I drilled a few holes in the appropriate locations and added the hooks bent from 0.4 mm steel wire.
Revell does provide the decals to mark the position of the tow hooks, but doesn't provide the actual tow hooks.
To that end I drilled a few holes in the appropriate locations and added the hooks bent from 0.4 mm steel wire.
The tow hooks will be painted bright red right at the end of the build.
Once again I can mention that the decals from Revell performed flawlessly.
They're very thin and opaque and respond well to decal setting solutions (in my case Micro Set and Micro Sol).
I'm very happy with how smooth the decal application went.
There were a few minor spots which needed some extra attention. One (tiny) air bubble and a few creases. Nothing too dramatic.
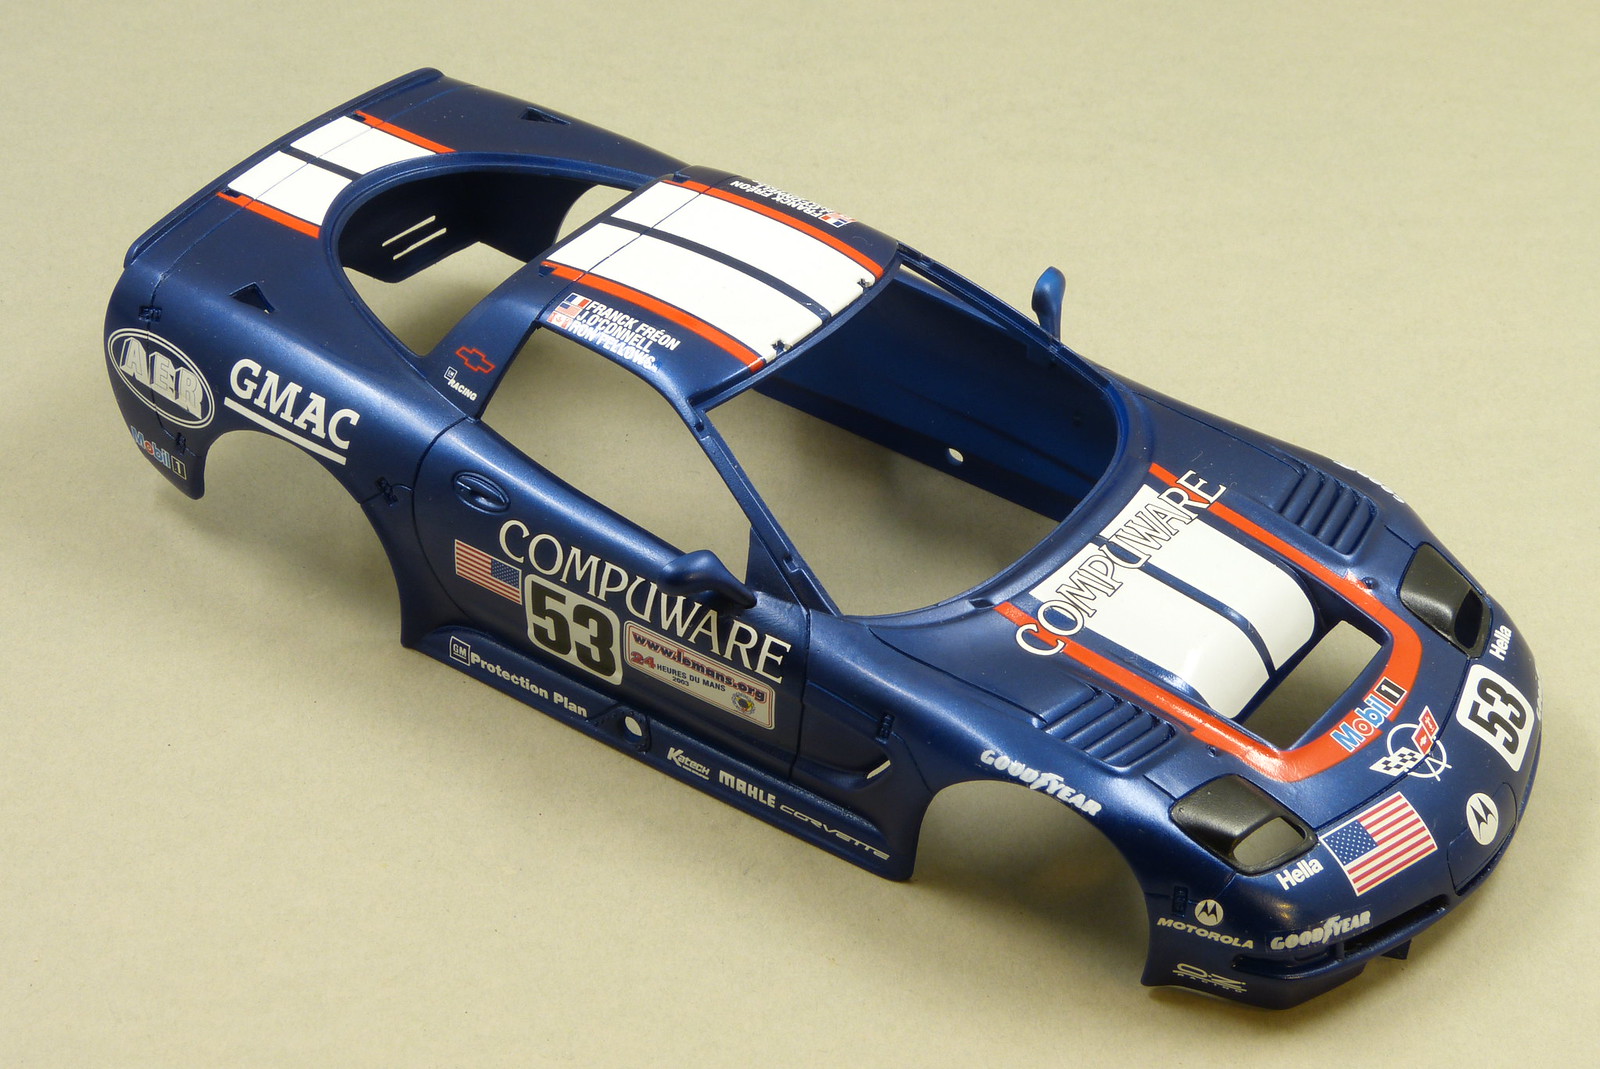
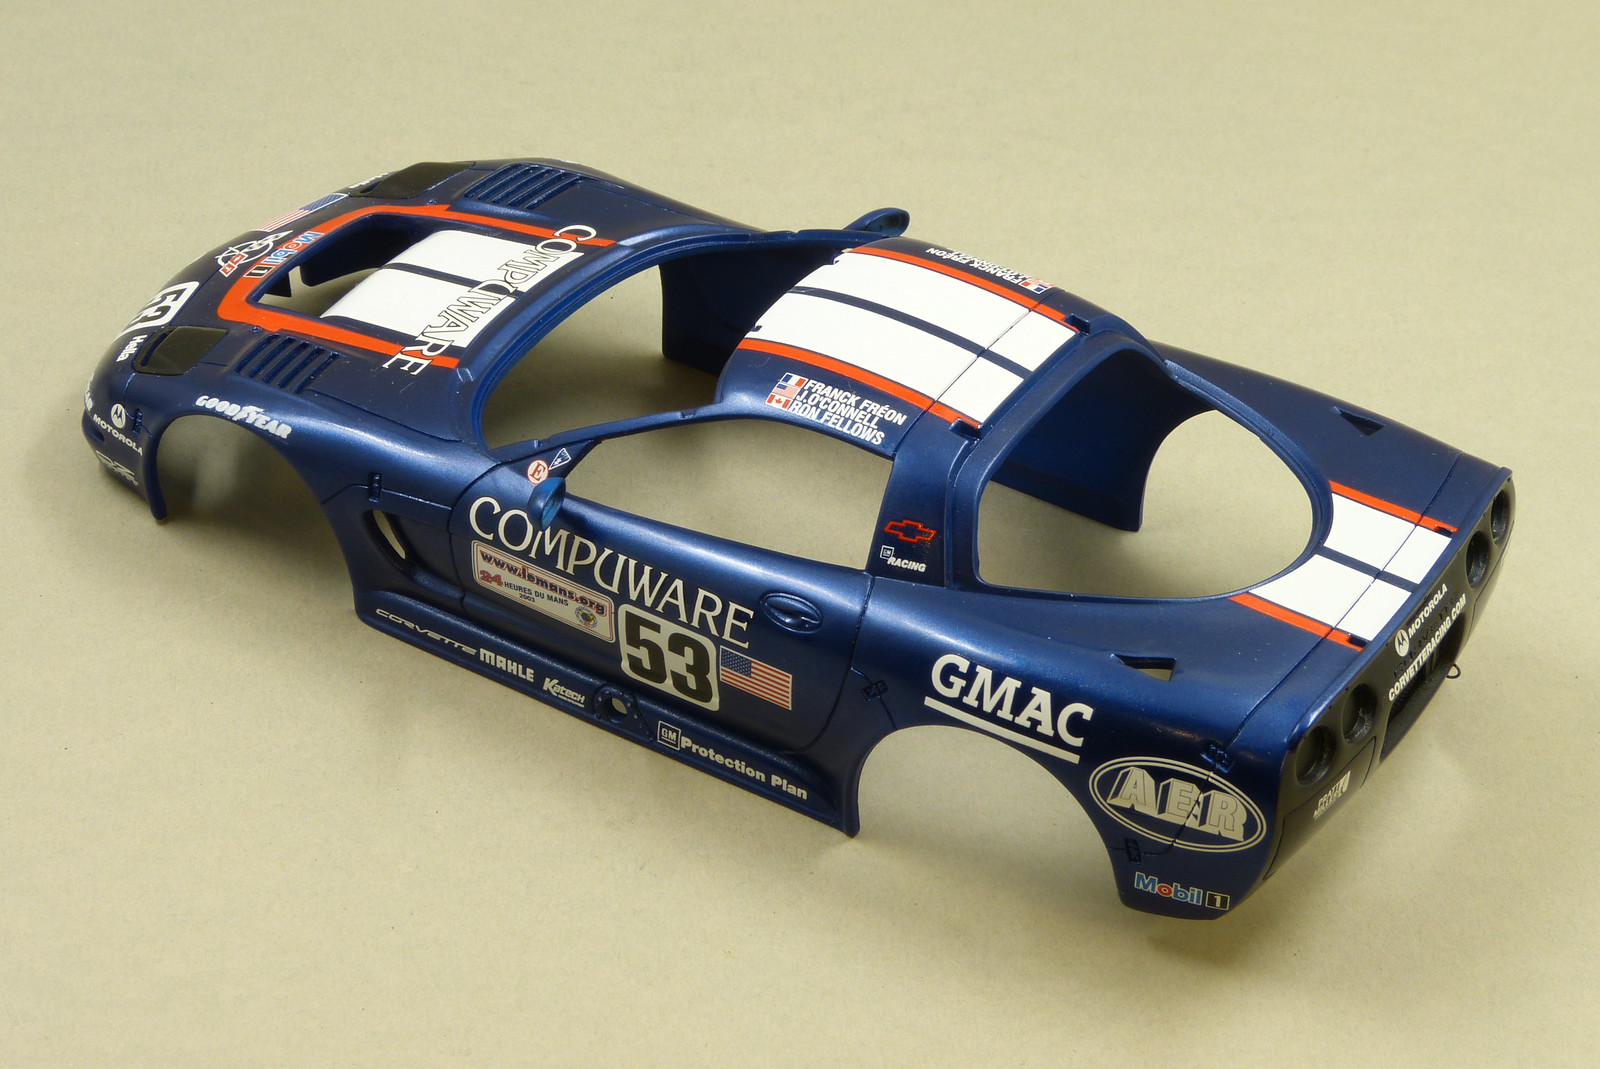
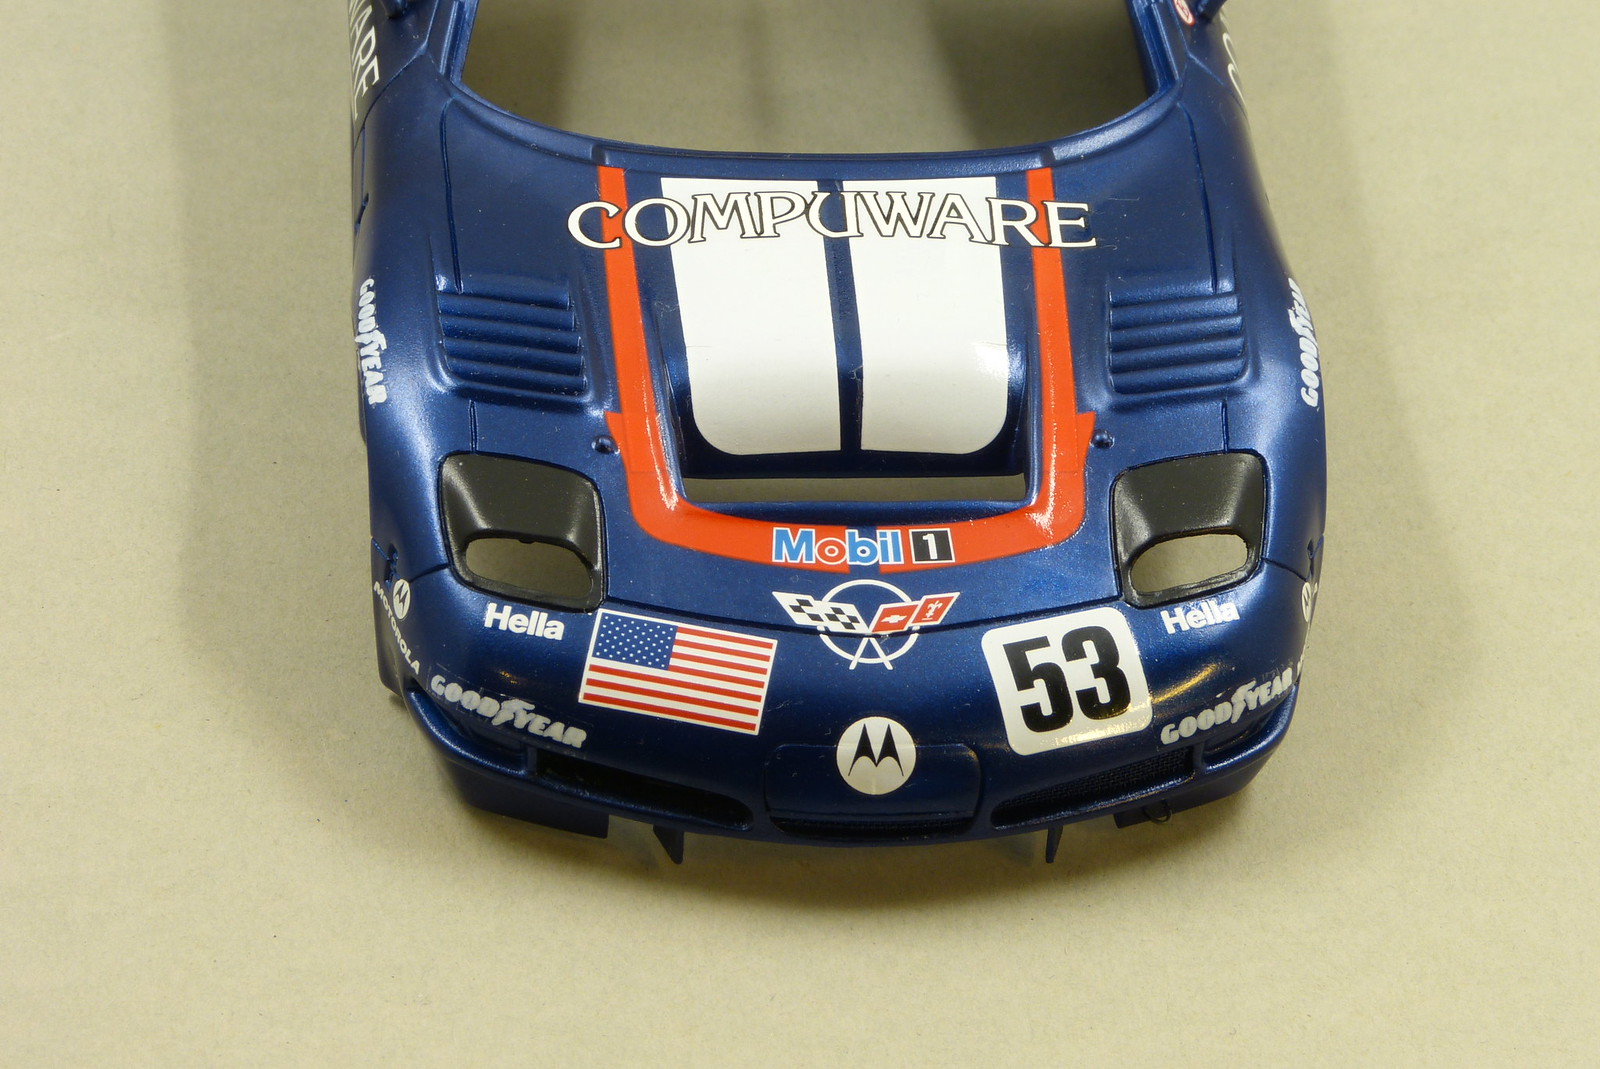
One thing was a bit odd concerning the decals for the bonnet. And here I have to accept some blame too, because I could have foreseen this problem.
The red striping on the bonnet is split into 3 decals. Personally I think that Revell could have made this as one decal. Might have been a bit more fiddly, but the result would have been tons better.
Apart from that it turned out that because I altered the nose of the car the red striping with the Mobil 1 logo sits further back on the bonnet as originally intended by Revell.
As a result the two stripes that connect to the center section are too long. Stupid that I didn't think of this before.
Another problem with the center section is that the striping gets wider at both ends. So much so that it is impossible to connect the side sections to them without a step in the red striping.
I don't know the reasoning behind this, but I should have checked this earlier and cut off the wider part.
Now I have to sand/repaint this particular section to get it to look better.
One small niggle I got with the decals from Revell is the fact that the size of several decals does not correspond with their real life counterpart. For instance the American flag on the nose is quite a bit larger than the ones in my reference images.
On the other hand we have the Corvette logo in the center of the nose which is clearly smaller than it should have been.
But on the whole, I'm quite pleased with how this turned out.
The Good Year decals present on the car weren't on the decalsheet supplied by Revell. I used some aftermarket decals for these. Not 100% correct, but good enough for me.
To finish off this blog entry I'd like to give a big thumbs up to the aftersales service from Revell.
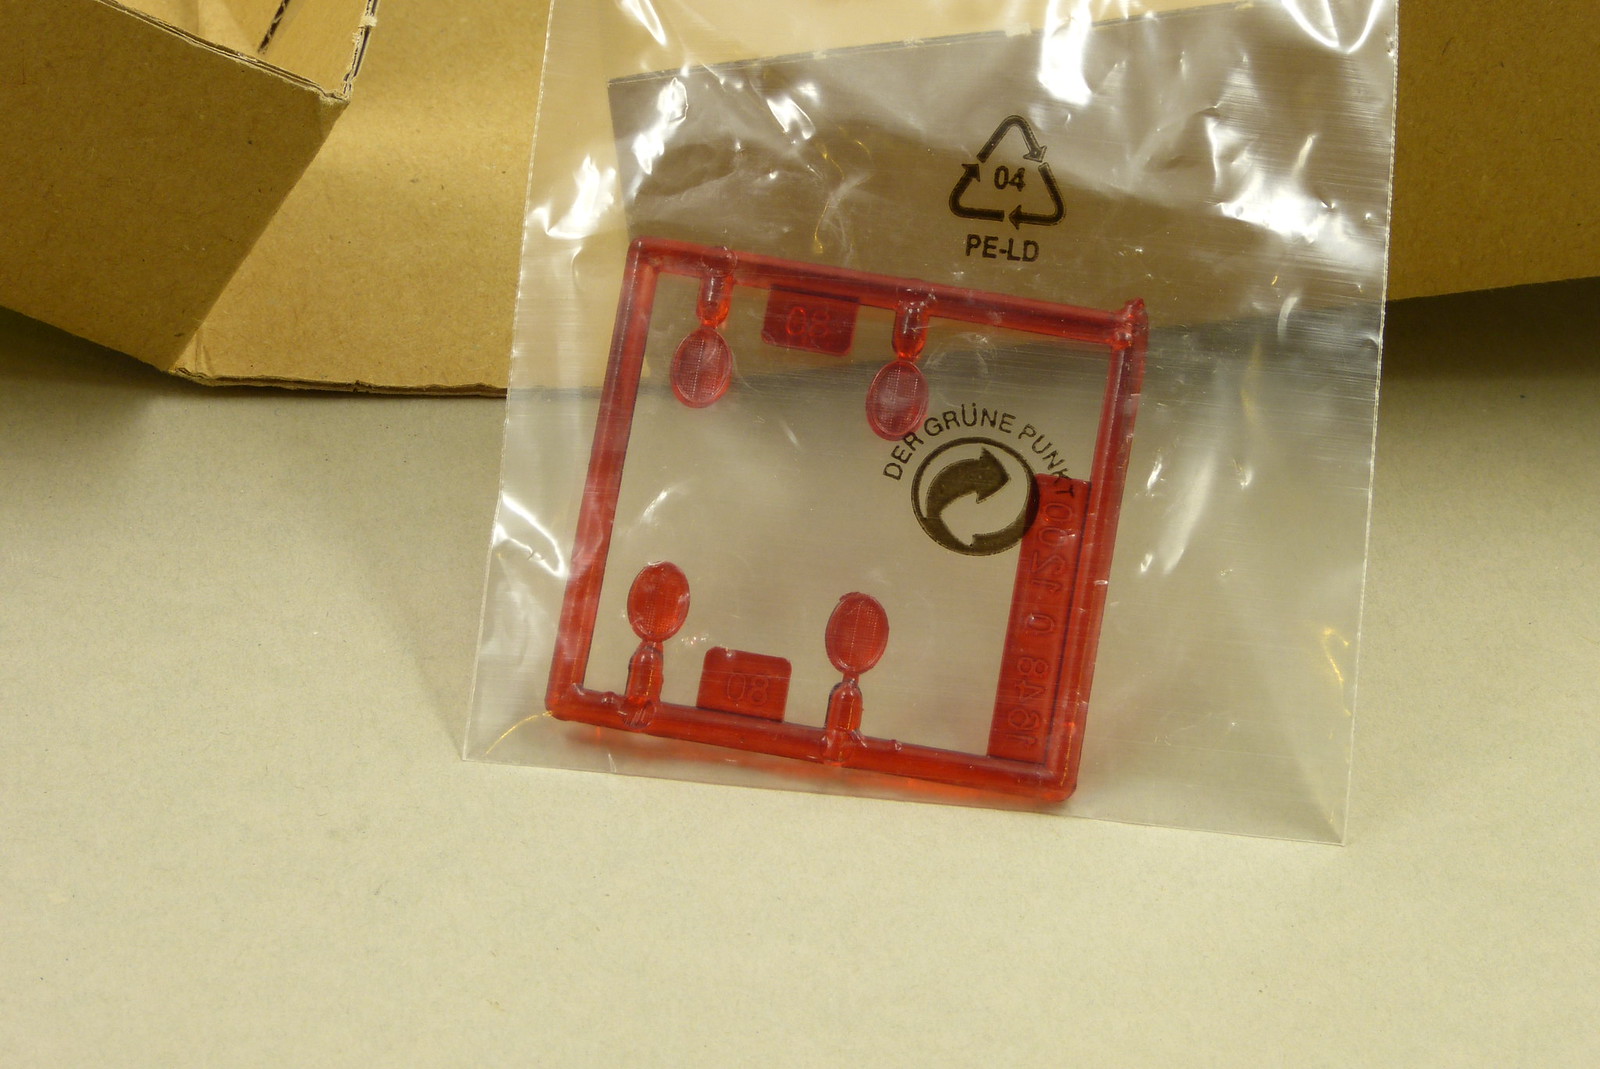
Due to my own stupidity (or actually my lack of good housekeeping) I managed to loose the sprue with the rear lights. For some reason I decided it wouldn't be logical to keep these together with the other parts of the car.
A quick note to Revell and a week or so later the new parts arrived in the mailbox. For free.
Thank you Revell !

I'm very happy with how smooth the decal application went.
There were a few minor spots which needed some extra attention. One (tiny) air bubble and a few creases. Nothing too dramatic.
One thing was a bit odd concerning the decals for the bonnet. And here I have to accept some blame too, because I could have foreseen this problem.
The red striping on the bonnet is split into 3 decals. Personally I think that Revell could have made this as one decal. Might have been a bit more fiddly, but the result would have been tons better.
Apart from that it turned out that because I altered the nose of the car the red striping with the Mobil 1 logo sits further back on the bonnet as originally intended by Revell.
As a result the two stripes that connect to the center section are too long. Stupid that I didn't think of this before.
Another problem with the center section is that the striping gets wider at both ends. So much so that it is impossible to connect the side sections to them without a step in the red striping.
I don't know the reasoning behind this, but I should have checked this earlier and cut off the wider part.
Now I have to sand/repaint this particular section to get it to look better.
One small niggle I got with the decals from Revell is the fact that the size of several decals does not correspond with their real life counterpart. For instance the American flag on the nose is quite a bit larger than the ones in my reference images.
On the other hand we have the Corvette logo in the center of the nose which is clearly smaller than it should have been.
But on the whole, I'm quite pleased with how this turned out.
The Good Year decals present on the car weren't on the decalsheet supplied by Revell. I used some aftermarket decals for these. Not 100% correct, but good enough for me.
To finish off this blog entry I'd like to give a big thumbs up to the aftersales service from Revell.
Due to my own stupidity (or actually my lack of good housekeeping) I managed to loose the sprue with the rear lights. For some reason I decided it wouldn't be logical to keep these together with the other parts of the car.
A quick note to Revell and a week or so later the new parts arrived in the mailbox. For free.
Thank you Revell !
Comments
Post a Comment