Decalling the body
Before I started with decalling car body, I glued the air scoop on the roof of the car. I did sand the rear end of the air scoop a bit. I saw on some reference pictures that the air scoop wasn't closed. But the part provided with the kit was closed, so I opened it up.

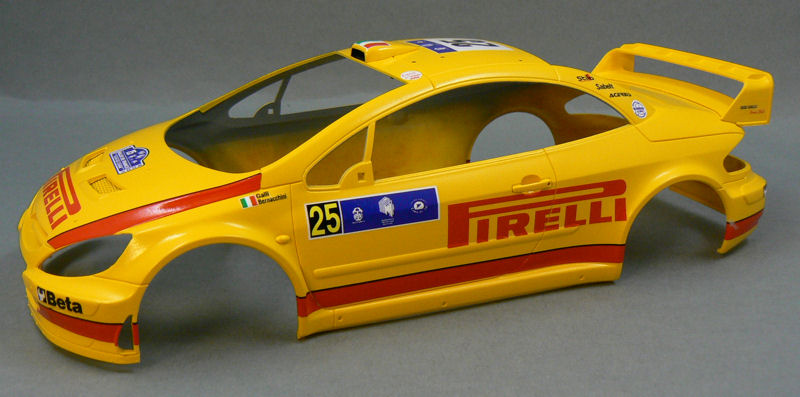
 Decalling actually went without a problem. The decals for this build
were made by Renaissance and are really great. I used MicroScale Set and
Sol to get the decals to conform to the shape of the car. And bar for a
few minor niggles, everything went without a hitch.
Decalling actually went without a problem. The decals for this build
were made by Renaissance and are really great. I used MicroScale Set and
Sol to get the decals to conform to the shape of the car. And bar for a
few minor niggles, everything went without a hitch.
You can see the current state of affairs on the pictures below.

 The keen observer of the pictures above may have noticed the minor niggles I was referring to.
Although I used Set and Sol on the decals, a few of them didn't want to down perfectly, as can be seen in the following pictures.

 I am going to try to rectify that, but my efforts have so far been fruitless... But I keep trying.
Another minor thing I want to fix before I clearcoat the body is the fact that some of the decals do not completely cover the intended area. See the pictures below.
I want to try and mix the right shade of red to fill-in the spots that have not been covered by the decals.

 Brake duct
Another thing I've been working on for this kit is the brake ducts.
On the tarmac rallies the Peugeot 307 (at least Gigi Galli's car) hade been equipped with bigger brake ducts. There are no brake ducts in Tamiya's kit, so this was something I had to scratchbuild.
On the right picture above, the brake ducts can be seen to the right and left of the Bozian-lettering on the intake mesh.
After I made a draft of the brake ducts in 3D, I cut the flat parts from a thin sheet of brass and folded the parts with my newly acquired Etchmate tool.

 The brake ducts on the picture above aren't the final ones. I wasn't
totally satisfied with the ones above, so I've been folding some new
ones, of which I don't have taken pictures yet.
The brake ducts on the picture above aren't the final ones. I wasn't
totally satisfied with the ones above, so I've been folding some new
ones, of which I don't have taken pictures yet.
Rims
The final parts I want to show in this update are the rims.
After I adapted the 15-spoke rims from the Bozian Peugeot 206 kit to this car, I painted them white with Tamiya X-2.
In the meantime I've also painted the bolts of the wheels and the centers of the rims.
For the spare wheel I have drilled out the holes where the bolts should go (not that anybody will ever see, because the spare wheel will be tucked away in the back of the car).

 On the right picture are some tires (with the wrong rims). The left tyre
has been sanded (a bit) to get rid of the mould line which runs over
the middle (as can be seen on the right tyre).
On the right picture are some tires (with the wrong rims). The left tyre
has been sanded (a bit) to get rid of the mould line which runs over
the middle (as can be seen on the right tyre).
End of this update...
Before I started with decalling car body, I glued the air scoop on the roof of the car. I did sand the rear end of the air scoop a bit. I saw on some reference pictures that the air scoop wasn't closed. But the part provided with the kit was closed, so I opened it up.
You can see the current state of affairs on the pictures below.
Although I used Set and Sol on the decals, a few of them didn't want to down perfectly, as can be seen in the following pictures.
Another minor thing I want to fix before I clearcoat the body is the fact that some of the decals do not completely cover the intended area. See the pictures below.
I want to try and mix the right shade of red to fill-in the spots that have not been covered by the decals.
Another thing I've been working on for this kit is the brake ducts.
On the tarmac rallies the Peugeot 307 (at least Gigi Galli's car) hade been equipped with bigger brake ducts. There are no brake ducts in Tamiya's kit, so this was something I had to scratchbuild.
On the right picture above, the brake ducts can be seen to the right and left of the Bozian-lettering on the intake mesh.
After I made a draft of the brake ducts in 3D, I cut the flat parts from a thin sheet of brass and folded the parts with my newly acquired Etchmate tool.
Rims
The final parts I want to show in this update are the rims.
After I adapted the 15-spoke rims from the Bozian Peugeot 206 kit to this car, I painted them white with Tamiya X-2.
In the meantime I've also painted the bolts of the wheels and the centers of the rims.
For the spare wheel I have drilled out the holes where the bolts should go (not that anybody will ever see, because the spare wheel will be tucked away in the back of the car).
End of this update...
Comments
Post a Comment