Through the roof (well, almost)
Work is finally continuing on this car. And work continues (once again) with the roof...
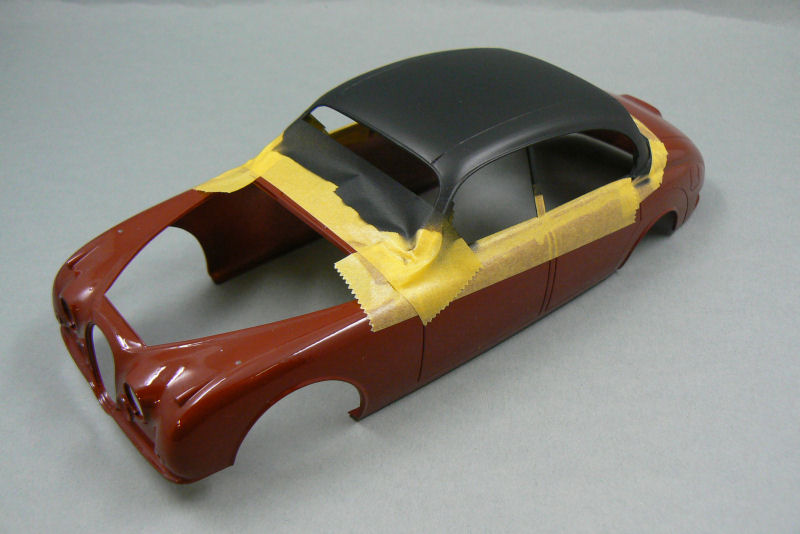
In the previous update you could see that I glued new pieces of fine wire onto the roof. But at the ends of the wires you can also see that I held them in place with tape.
So there was no glue at the ends. And at first I had a bit of a hard time getting the ends glued to the roof, but with a little help of some friends, that problem was quickly resolved.
After everything was nicely glued to the roof, it was painting time. To that end I used once more semi gloss black from the Revell Aqua Color range. It dries almost instantly and gives a very smooth finish.
So smooth in fact, that I could very easily see were I had been a bit "trigger-happy" with the glue. Darn.

 That needed to be fixed.
Luckily, it just had been my birthday. And since a few days I was the proud owner of a Dremel Stylus. Niiiiice.
So, I chucked in a grinding tool and ground away at the roof. And it looked absolutely fabulous. I took every care not to grind too deep and it looked perfect.
After grinding, I smoothed the roof once more with some sanding sticks and for the n-th time I airbrushed the roof.

 My first reaction was : What the f... ?
So, were it at first appeared that everything was perfect, it was actually far from it.
In fact, it took me 2 more attempts to get the roof to look good again. There is one minor spot still left, but I won't be repairing that as it isn't very disturbing.
Of this current state I didn't take any pictures yet, so you'll see the finished roof in the next update.
It is nice to see that more sections of this car are nearing completion. The end of this build is now really drawing near. Which isn't a bad thing, because I've been working on it for long enough.
Below a few pictures of the tires (which have been sanded to remove the mold line) and the finished wheels.

 the exhaust
Next up was the exhaust. As I mentioned in a previous update, the exhaust system of this kit is for the 3.6 litre engine. Which in effect means that the car has a double exhaust pipe.
The car which inspector Morse drove had a 2.4 litre engine and a single exhaust.
For this operation I cut up the exhaust of this kit and the exhaust of a Revell Jaguar XK120 kit (of which I have used the hubcaps, depicted on the previous page).
But before I could testfit the new exhaust I had to mount the engine to the floor.
My intention was to leave the engine out as long as possible so that I had the opportunity to put some extra detail into the engine compartment.
But as this build is going on and as I've received some excellent reference pictures of the newly restored original car there are reasons for me not to put a lot of detail and effort into the engine compartment.
First reason is that I think it is about time to finish the build, and adding extra detail will only cost more time.
But more importantly, the engine in the original car is quite different from the kit engine, and making an exact replica is above my abilities at the moment.
So that's why I decided to glue in the engine now so I was able to finish the underside of the car.

 In the pictures below you can seen the new exhaust system.
First part of the exhaust is from the Tamiya kit. The silencer and last part of the exhaust are from the Revell kit.
I drilled small holes into the exhaust pipes and glued some wire into the parts to aid mounting of these parts to the silencer.
In the second picture you can see the complete exhaust. I fixed the parts with some tape and some other stuff, because this picture was taken while the glue was curing.

 After the glue had cured I smoothed out several joints with some putty and the exhaust is now ready to be painted.
Final parts I've been working on are the rearview mirrors.
To get them to look like the real thing, I applied some putty to the back.
After the putty had dried I sanded the rear of the mirrors round. And I think it looks good.
After sanding I noticed that there were several air bubbles in the putty, so I tried to smoothen the surface with some diluted Krystal Klear.
The picture below was taken before I painted these parts. Currently they're painted black and I intend to spray them with Alclad Chrome.
But first I have to make sure that the back of the mirrors is as smooth as possible.
 More on the build of this car in the next update !
Work is finally continuing on this car. And work continues (once again) with the roof...
In the previous update you could see that I glued new pieces of fine wire onto the roof. But at the ends of the wires you can also see that I held them in place with tape.
So there was no glue at the ends. And at first I had a bit of a hard time getting the ends glued to the roof, but with a little help of some friends, that problem was quickly resolved.
After everything was nicely glued to the roof, it was painting time. To that end I used once more semi gloss black from the Revell Aqua Color range. It dries almost instantly and gives a very smooth finish.
So smooth in fact, that I could very easily see were I had been a bit "trigger-happy" with the glue. Darn.
Luckily, it just had been my birthday. And since a few days I was the proud owner of a Dremel Stylus. Niiiiice.
So, I chucked in a grinding tool and ground away at the roof. And it looked absolutely fabulous. I took every care not to grind too deep and it looked perfect.
After grinding, I smoothed the roof once more with some sanding sticks and for the n-th time I airbrushed the roof.
So, were it at first appeared that everything was perfect, it was actually far from it.
In fact, it took me 2 more attempts to get the roof to look good again. There is one minor spot still left, but I won't be repairing that as it isn't very disturbing.
Of this current state I didn't take any pictures yet, so you'll see the finished roof in the next update.
It is nice to see that more sections of this car are nearing completion. The end of this build is now really drawing near. Which isn't a bad thing, because I've been working on it for long enough.
Below a few pictures of the tires (which have been sanded to remove the mold line) and the finished wheels.
Next up was the exhaust. As I mentioned in a previous update, the exhaust system of this kit is for the 3.6 litre engine. Which in effect means that the car has a double exhaust pipe.
The car which inspector Morse drove had a 2.4 litre engine and a single exhaust.
For this operation I cut up the exhaust of this kit and the exhaust of a Revell Jaguar XK120 kit (of which I have used the hubcaps, depicted on the previous page).
But before I could testfit the new exhaust I had to mount the engine to the floor.
My intention was to leave the engine out as long as possible so that I had the opportunity to put some extra detail into the engine compartment.
But as this build is going on and as I've received some excellent reference pictures of the newly restored original car there are reasons for me not to put a lot of detail and effort into the engine compartment.
First reason is that I think it is about time to finish the build, and adding extra detail will only cost more time.
But more importantly, the engine in the original car is quite different from the kit engine, and making an exact replica is above my abilities at the moment.
So that's why I decided to glue in the engine now so I was able to finish the underside of the car.
First part of the exhaust is from the Tamiya kit. The silencer and last part of the exhaust are from the Revell kit.
I drilled small holes into the exhaust pipes and glued some wire into the parts to aid mounting of these parts to the silencer.
In the second picture you can see the complete exhaust. I fixed the parts with some tape and some other stuff, because this picture was taken while the glue was curing.
Final parts I've been working on are the rearview mirrors.
To get them to look like the real thing, I applied some putty to the back.
After the putty had dried I sanded the rear of the mirrors round. And I think it looks good.
After sanding I noticed that there were several air bubbles in the putty, so I tried to smoothen the surface with some diluted Krystal Klear.
The picture below was taken before I painted these parts. Currently they're painted black and I intend to spray them with Alclad Chrome.
But first I have to make sure that the back of the mirrors is as smooth as possible.
Comments
Post a Comment