Clear !
It was about time that this car would get a layer of clear on.
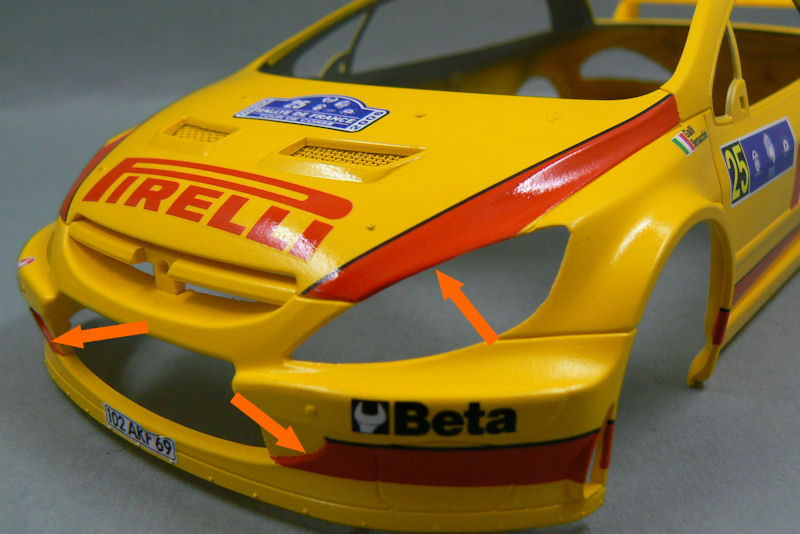
But before I could do that, I had to touch up a few spots with "Pirelli red". When I applied the decals I made some minor mistakes in positioning them. So a few spots needed some extra attention.
Although I have about 6 or 7 shades of red in my paint collection, the right one wasn't there. So I had to mix the correct shade of red.
That took some time, but I in the end I managed to find a shade which looked good enough.

 After the spots had been touched up, I let the paint dry for some more days. After that, it was time for the clear.
I used the same 2K clear I used on the Ferrari F430. Thanks to my new fan (higher capacity) there were considerably less fumes inside the cabin and the room.
After I cleared the car I put a cover in front of the airbrush cabin (leaving only a small opening for the air) to prevent dust from settling on the model during drying of the clear.
This, the cover, and the more powerfull fan really helped in preventing dust from falling onto the drying clear.
The results of the clearing can be seen below.

 In the pictures it seems like there is a very thick layer of clear on
the model. But in reality, it isn't as pronounced. And apart from that,
I've noticed that the clear shrinks slightly as time passes. The
pictures above have been taken only a few days after the clearing
process.
In the pictures it seems like there is a very thick layer of clear on
the model. But in reality, it isn't as pronounced. And apart from that,
I've noticed that the clear shrinks slightly as time passes. The
pictures above have been taken only a few days after the clearing
process.
In those pictures, you can also see that I have painted the window trims on the car.
And if you look closely you can also see that I have to do it again. Especially the lines below the windows aren't the tidiest. I think that's a result of the way I masked the window trim.
I put masking tape over the window trim, and using a new and sharp #11 blade in my hobby knife I cut the masking tape along the window trim. But the line along which I had to cut the tape wasn't very clear everywhere. So that's why it's a bit of a jagged edge at the bottom of the windows.
I'll be masking the window trim again shortly. But this time I'm going to slice the Tamiya masking tape into very narrow strips. The advantage is that they're still flexible enough to be bend along complex curves. Once these small strips are on, I'll mask off the rest of the car and proceed with the painting.
Work on the chassis
I've also been working on the chassis of the car.
I was about to put it together. But during a final dryfit, I noticed that the top side of the chassis was still partly visible because the wheel wells don't fit up to the body shell.
That's why I decided to paint part of the top side of the chassis, as can be seen in the first picture below.
Otherwise, assembly of the wheel wells and suspension was pretty straightforward. With the crews that Tamiya provided, the wheel wells are screwed to the floor plate.


 Only part that I have to take care of now, to finish the chassis, is the
exhaust-driveshaft section. At least, that is what the lump of plastic
has to depict...
Only part that I have to take care of now, to finish the chassis, is the
exhaust-driveshaft section. At least, that is what the lump of plastic
has to depict...
Other work
Some small other things I've been working on are listed below.
First up is the dashboard. As I plan to build the cars with the windows rolled down, I decided that the dashboard might use a bit of extra attention.
On my reference pictures there's a cable running from the steering wheel to the dashboard. So I wound a small piece of insulated wire around a plastic rod to create the cable shown below.

 Apart from that I've also been working on the air intake. On the real
car the word "Bozian" is painted on the grille of the air intake.
Renaissance has included a Bozian decal in their decal set. But as I've
used a different kind of mesh for the grille, the decal could not be
used.
Apart from that I've also been working on the air intake. On the real
car the word "Bozian" is painted on the grille of the air intake.
Renaissance has included a Bozian decal in their decal set. But as I've
used a different kind of mesh for the grille, the decal could not be
used.
That's why I decided to make a template and paint the letters on the grille.
It took me several attempts to get the size of the letters correct, but in the end it turned out great.
It was about time that this car would get a layer of clear on.
But before I could do that, I had to touch up a few spots with "Pirelli red". When I applied the decals I made some minor mistakes in positioning them. So a few spots needed some extra attention.
Although I have about 6 or 7 shades of red in my paint collection, the right one wasn't there. So I had to mix the correct shade of red.
That took some time, but I in the end I managed to find a shade which looked good enough.
I used the same 2K clear I used on the Ferrari F430. Thanks to my new fan (higher capacity) there were considerably less fumes inside the cabin and the room.
After I cleared the car I put a cover in front of the airbrush cabin (leaving only a small opening for the air) to prevent dust from settling on the model during drying of the clear.
This, the cover, and the more powerfull fan really helped in preventing dust from falling onto the drying clear.
The results of the clearing can be seen below.
In those pictures, you can also see that I have painted the window trims on the car.
And if you look closely you can also see that I have to do it again. Especially the lines below the windows aren't the tidiest. I think that's a result of the way I masked the window trim.
I put masking tape over the window trim, and using a new and sharp #11 blade in my hobby knife I cut the masking tape along the window trim. But the line along which I had to cut the tape wasn't very clear everywhere. So that's why it's a bit of a jagged edge at the bottom of the windows.
I'll be masking the window trim again shortly. But this time I'm going to slice the Tamiya masking tape into very narrow strips. The advantage is that they're still flexible enough to be bend along complex curves. Once these small strips are on, I'll mask off the rest of the car and proceed with the painting.
Work on the chassis
I've also been working on the chassis of the car.
I was about to put it together. But during a final dryfit, I noticed that the top side of the chassis was still partly visible because the wheel wells don't fit up to the body shell.
That's why I decided to paint part of the top side of the chassis, as can be seen in the first picture below.
Otherwise, assembly of the wheel wells and suspension was pretty straightforward. With the crews that Tamiya provided, the wheel wells are screwed to the floor plate.
Other work
Some small other things I've been working on are listed below.
First up is the dashboard. As I plan to build the cars with the windows rolled down, I decided that the dashboard might use a bit of extra attention.
On my reference pictures there's a cable running from the steering wheel to the dashboard. So I wound a small piece of insulated wire around a plastic rod to create the cable shown below.
That's why I decided to make a template and paint the letters on the grille.
It took me several attempts to get the size of the letters correct, but in the end it turned out great.
Comments
Post a Comment