The Interior, continued
Work has been going on with the interior of this car. And I must say that I am quite happy with the results so far.
After I had painted (most of) the interior in the previous update, it was time to start with the decalling.
As I have shown in the last photo of the previous update, there are a lot of decals that have to be applied onto the interior to simulate the wood that's been used in the real car.
I started with the sidepanels (or doors actually). After I had painted the levers for the doors and the windows I started with the decals.
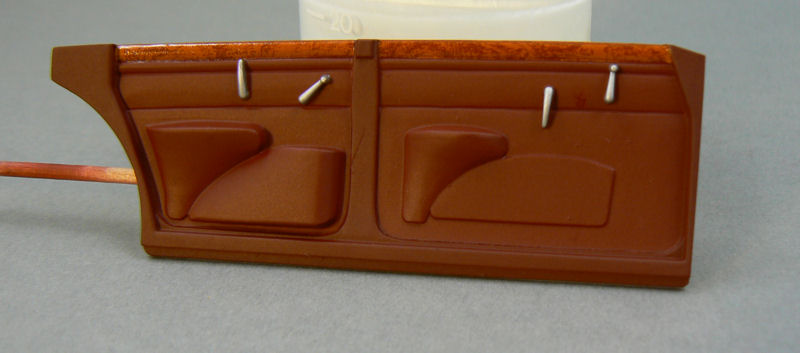 I really wonder how I could have managed that without Micro Sol and Set, to get the decals to conform to the shape of the door.
After applying Micro Sol I thought that nothing happened. Than the decals got all wrinkled. But after some time they smoothed out nicely, as can be seen from the picture above.
Strengthened by the results from the doors, I started on the dashboard. A bit more work, as the dashboard is quite complex in shape and the number of decals I had to apply (apart from the woodwork also the dials) was also a bit higher.
I spread this job over several days, to give the decals some time to settle and let the Micro Sol do it's job.
In the end, I can say that it was quite easy to apply the decals. But next time I'll have to pay a bit more attention to the positioning and smoothing of the decals as there are quite a few wrinkles visible in the dashboard decals. Even after several applications of Micro Sol the wrinkles are still there.
Not disturbing enough for me, but it's definately an area where I could and should improve.
 After all the decals had set, I sprayed another layer of semigloss clear
over the parts to seal in the decals. After that I brushpainted some
gloss clear over the decals only to give the woodwork a bit of shine.
After all the decals had set, I sprayed another layer of semigloss clear
over the parts to seal in the decals. After that I brushpainted some
gloss clear over the decals only to give the woodwork a bit of shine.
And after that had been done, I gave the dials some lenses by filling the dial areas with Micro Kristal Klear. Which gives a nice effect.
I'll post a picture of this in another update.
While I busied myself with the decals, inbetween applying and drying I also started on the floor of the car.
As I've shown in the previous update, I had already cut the floormats to size, and now it was time to glue them to the floor. Thanks to the adhesive backing that was a piece of cake.
 After I had applied the floormats, I wanted to "finish" the floorplate of the car.
So I glued the rear suspension to the floorplate. And after that glued the rear brake discs to the suspension. Pretty straightforward.

 I was also planning to attach the front suspension to the car. But as I
am planning to do a bit of detailing in the engine room, I thought it
would be better to leave the engine out for now. And that means that I
cannot fix the front suspension yet, because the engine has to be
mounted from the underside.
I was also planning to attach the front suspension to the car. But as I
am planning to do a bit of detailing in the engine room, I thought it
would be better to leave the engine out for now. And that means that I
cannot fix the front suspension yet, because the engine has to be
mounted from the underside.
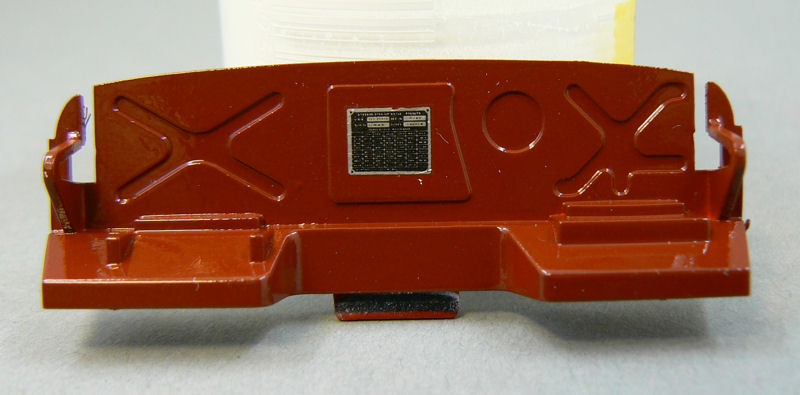
 As I was applying decals all over the place, I also applied the decal (or actually car specs plate) to the engine room wall.
 Finally for this update I want to show you what the gear-shift lever
looks like after the little bit of scratch-building I had to do.
Finally for this update I want to show you what the gear-shift lever
looks like after the little bit of scratch-building I had to do.
Up close it isn't totally convincing, but I'm sure nobody will notice that the original is missing once it is mounted onto the floorplate and surrounded by the other parts that make up the interior.
After I painted the leather-like part in the interior colour, I painted the lever silver (Revell Aqua Color) and after that I dipped the top of the lever in unthinned (ie. quite thick) Revell Aqua Color Semigloss black. I repeated this last action several times to build up a nice layer of paint to simulate the knob on the end of the gear-shift lever.
 And that's it for this time.
Stay tuned for the next update !
Work has been going on with the interior of this car. And I must say that I am quite happy with the results so far.
After I had painted (most of) the interior in the previous update, it was time to start with the decalling.
As I have shown in the last photo of the previous update, there are a lot of decals that have to be applied onto the interior to simulate the wood that's been used in the real car.
I started with the sidepanels (or doors actually). After I had painted the levers for the doors and the windows I started with the decals.
After applying Micro Sol I thought that nothing happened. Than the decals got all wrinkled. But after some time they smoothed out nicely, as can be seen from the picture above.
Strengthened by the results from the doors, I started on the dashboard. A bit more work, as the dashboard is quite complex in shape and the number of decals I had to apply (apart from the woodwork also the dials) was also a bit higher.
I spread this job over several days, to give the decals some time to settle and let the Micro Sol do it's job.
In the end, I can say that it was quite easy to apply the decals. But next time I'll have to pay a bit more attention to the positioning and smoothing of the decals as there are quite a few wrinkles visible in the dashboard decals. Even after several applications of Micro Sol the wrinkles are still there.
Not disturbing enough for me, but it's definately an area where I could and should improve.
And after that had been done, I gave the dials some lenses by filling the dial areas with Micro Kristal Klear. Which gives a nice effect.
I'll post a picture of this in another update.
While I busied myself with the decals, inbetween applying and drying I also started on the floor of the car.
As I've shown in the previous update, I had already cut the floormats to size, and now it was time to glue them to the floor. Thanks to the adhesive backing that was a piece of cake.
So I glued the rear suspension to the floorplate. And after that glued the rear brake discs to the suspension. Pretty straightforward.
Up close it isn't totally convincing, but I'm sure nobody will notice that the original is missing once it is mounted onto the floorplate and surrounded by the other parts that make up the interior.
After I painted the leather-like part in the interior colour, I painted the lever silver (Revell Aqua Color) and after that I dipped the top of the lever in unthinned (ie. quite thick) Revell Aqua Color Semigloss black. I repeated this last action several times to build up a nice layer of paint to simulate the knob on the end of the gear-shift lever.
Stay tuned for the next update !
Comments
Post a Comment