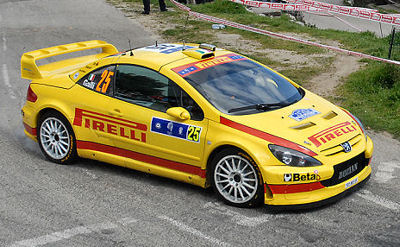
This will be the Build Report for the Peugeot 307 WRC Pirelli, as driven by Gigi Galli in 2006.
In case you're wondering, what's this all about, here's a picture of the real thing:
 Why this car ?
Why this driver ?
Why another kit (asked my (then) girlfriend) ?
This car, because I really like the livery. Simple but very attractive. And apart from that, relatively easy for a returning modeler.
This driver, because Gigi Galli brings a bit of action to the WRC. Apart from his, often spectacular, driving style, I really admire him for his temperament and emotions.
The best example being that he tried to molest his co-driver (some rally in 2005 when he was driving for Mitsubishi) because he got some pace-notes wrong, while driving at excessive speeds across a special stage. I love that guy !
And another kit because I feel that I have an obligation to support the economy of the world. Or any other reason I need to buy another kit which might get built somewhere in this millenium...
This car is going to be build from the Tamiya Peugeot 307 WRC.
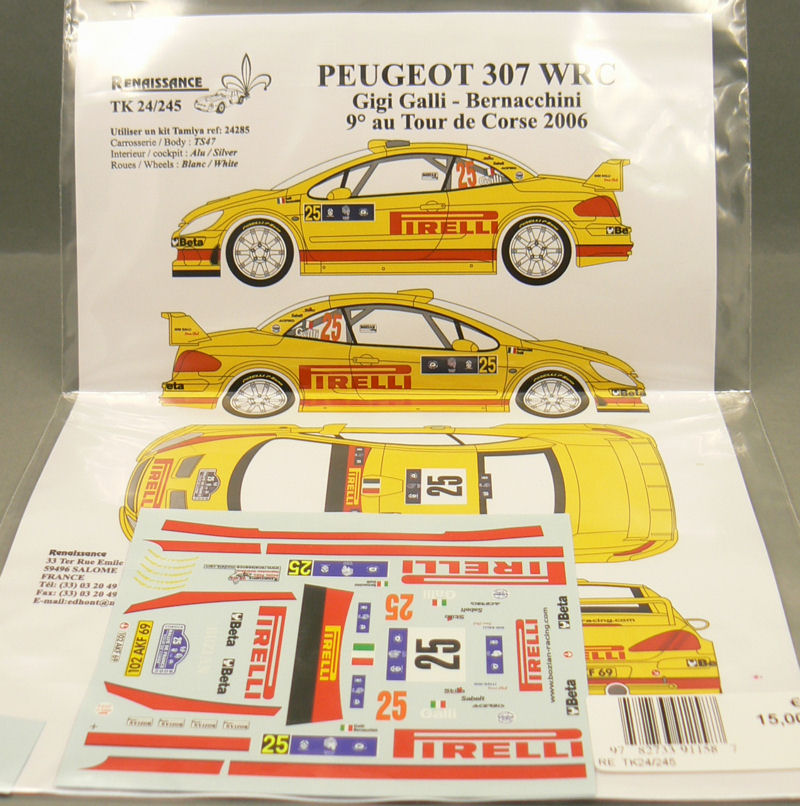
 The eagle-eyed reader of this page might say that there is a slight difference in color and sponsor-markings between the two cars.
To that end I bought the transkit from Renaissance (which I ordered from Domino Modelbouw in Belgium).
 To add a bit of extra detail to the kit I am going to use the photo etch set that Tamiya has released for this kit. Actually, apart from the dreadful die-cast chassis of this model (which has less detail than the regular plastic ones), another 'low-point' is the fact that there are several parts on the car that have so little detail (like the brake-discs) that you almost HAVE TO buy this PE set, to make it look anywhere near realistic.
A sad development if you ask me. But as this kit is the best of the two Peugeot 307 WRC kits on the market you don't have much choice if you're into building recent WRC cars.
 The Rims
The first job at hand for this build was the adaptation of the rims. If you look closely at the first image and the image of the box of the kit, you'll see that there's a difference between the rims.
In the Tamiya kit there are 10-spoke rims supplied. The rims with which the Peugeot team took part in the Rally de Monaco in 2005 (the car that can be build from this kit).
Gigi Galli however used 16-spoke OZ rims in the Tour de Corse rally (the version of this car which can be made with the decals from the transkit).
Luckily, I have a Peugeot 206 WRC Bozian Racing kit in my stash, which has exactly the 16-spoke rims I was looking for (right picture below).

 But, for this 307 kit, Tamiya has adopted a different style of attaching the wheels to the suspension. Where they normally use a male connection (left picture below), they used a female connection for the 307 (right picture below).
So, I had my work cut out. Because I wanted to use the 16-spoke wheels. So I somehow had to convert them to a female connection so that I can use them on the 307.

 First action was cutting up the original rims and free them of their female connector.
I used a photo etched saw that I ordered from Rai-Ro in Germany.

 Next I removed the male connector from the 16-spoke rims. Just used a plain old cutter for that.
After that I used a grinding tool in my Dremel to shave off several mm's of the center of the rim, because of the difference in length between the male and female (longer) connector.

 And after all this work I ended up with the following:
 All in all a very nice operation. And I am pleased with the end result.
Now, the rims will be put aside to start painting the car.
Painting the body (part 1)
According to the instructions on the Renaissance transkit, the colour to use for the car is Tamiya TS47, Chrome Yellow.
As I'm not very good at painting with the spray-can, I decided to decant the paint into a jar, let the solvent escape overnight, thin the paint with Tamiya's Lacquer Thinner and spray the paint on using my trusty Evolution 2-in-1 airbrush.
The paint went on superb. Between the different coats I had to sand a bit because of dust which had been trapped in the paint, but otherwise everything went smooth.
In the end I had sprayed 2 fine layers and 2 heavy layers of paint and the shine to the paint was already looking very promising, without even some kind of polishing. This was going to be very nice.
 But then came a discussion on Automotive Forums where another member was also building Gigi Galli's 307.
And in this thread a discussion was started concerning the correctness of the colour of the car. At first I was the defender of TS47, but after I took some pictures of this car outside in the sun, I too had to conclude that this particular colour is too dark. Maybe a result of putting 4 layers of paint on the model, which deepened the colour a bit.
But after I took the pictures I decided that I would strip the paintjob and will repaint the car with Tamiya acrylic paint colour X-8, Lemon Yellow.
Sadly, the layer's of paint are very stubborn and won't come loose easily, even after soaking for several days in brake fluid, so that's a bit of a setback.
The show must go on
While the body was soaking in the brake fluid, I went to work on some other parts of this kit.
The brakes were the first parts that were taken on. For the brake-disc faces I was going to use the intended etched parts. I painted the discs and the etched parts with Titanium Silver (X31) from Tamiya.
I must say that it is a very stubborn colour. I had a hard time stirring the paint to an homogenous mixture. And even than, after thinning with X20A, I had problems airbrushing the paint onto the parts. It was as if the airbrush was clogged as soon as I poured the paint into the cup. Strange.
The brake calipers were painted with Titanium Gold (X32) from Tamiya. And this colour was the total opposite. I had no problem getting an even coat onto the parts with a regular brush. Peculiar.
But in the end I'm satisfied with the result.

 Last thing I did on the brake-discs was paint the faces of the brakes were the PE part is going to come X10 Gun Metal. The idea is that the darker colour will show through the slots in the PE brake-disc faces, to add a bit more depth to the brakes.

Next: Part 2 of the build report.
In case you're wondering, what's this all about, here's a picture of the real thing:
Why this driver ?
Why another kit (asked my (then) girlfriend) ?
This car, because I really like the livery. Simple but very attractive. And apart from that, relatively easy for a returning modeler.
This driver, because Gigi Galli brings a bit of action to the WRC. Apart from his, often spectacular, driving style, I really admire him for his temperament and emotions.
The best example being that he tried to molest his co-driver (some rally in 2005 when he was driving for Mitsubishi) because he got some pace-notes wrong, while driving at excessive speeds across a special stage. I love that guy !
And another kit because I feel that I have an obligation to support the economy of the world. Or any other reason I need to buy another kit which might get built somewhere in this millenium...
This car is going to be build from the Tamiya Peugeot 307 WRC.
To that end I bought the transkit from Renaissance (which I ordered from Domino Modelbouw in Belgium).
A sad development if you ask me. But as this kit is the best of the two Peugeot 307 WRC kits on the market you don't have much choice if you're into building recent WRC cars.
The first job at hand for this build was the adaptation of the rims. If you look closely at the first image and the image of the box of the kit, you'll see that there's a difference between the rims.
In the Tamiya kit there are 10-spoke rims supplied. The rims with which the Peugeot team took part in the Rally de Monaco in 2005 (the car that can be build from this kit).
Gigi Galli however used 16-spoke OZ rims in the Tour de Corse rally (the version of this car which can be made with the decals from the transkit).
Luckily, I have a Peugeot 206 WRC Bozian Racing kit in my stash, which has exactly the 16-spoke rims I was looking for (right picture below).
So, I had my work cut out. Because I wanted to use the 16-spoke wheels. So I somehow had to convert them to a female connection so that I can use them on the 307.
I used a photo etched saw that I ordered from Rai-Ro in Germany.
After that I used a grinding tool in my Dremel to shave off several mm's of the center of the rim, because of the difference in length between the male and female (longer) connector.
Now, the rims will be put aside to start painting the car.
Painting the body (part 1)
According to the instructions on the Renaissance transkit, the colour to use for the car is Tamiya TS47, Chrome Yellow.
As I'm not very good at painting with the spray-can, I decided to decant the paint into a jar, let the solvent escape overnight, thin the paint with Tamiya's Lacquer Thinner and spray the paint on using my trusty Evolution 2-in-1 airbrush.
The paint went on superb. Between the different coats I had to sand a bit because of dust which had been trapped in the paint, but otherwise everything went smooth.
In the end I had sprayed 2 fine layers and 2 heavy layers of paint and the shine to the paint was already looking very promising, without even some kind of polishing. This was going to be very nice.
And in this thread a discussion was started concerning the correctness of the colour of the car. At first I was the defender of TS47, but after I took some pictures of this car outside in the sun, I too had to conclude that this particular colour is too dark. Maybe a result of putting 4 layers of paint on the model, which deepened the colour a bit.
But after I took the pictures I decided that I would strip the paintjob and will repaint the car with Tamiya acrylic paint colour X-8, Lemon Yellow.
Sadly, the layer's of paint are very stubborn and won't come loose easily, even after soaking for several days in brake fluid, so that's a bit of a setback.
The show must go on
While the body was soaking in the brake fluid, I went to work on some other parts of this kit.
The brakes were the first parts that were taken on. For the brake-disc faces I was going to use the intended etched parts. I painted the discs and the etched parts with Titanium Silver (X31) from Tamiya.
I must say that it is a very stubborn colour. I had a hard time stirring the paint to an homogenous mixture. And even than, after thinning with X20A, I had problems airbrushing the paint onto the parts. It was as if the airbrush was clogged as soon as I poured the paint into the cup. Strange.
The brake calipers were painted with Titanium Gold (X32) from Tamiya. And this colour was the total opposite. I had no problem getting an even coat onto the parts with a regular brush. Peculiar.
But in the end I'm satisfied with the result.
Next: Part 2 of the build report.
Comments
Post a Comment