This will be my Build Report for a Ferrari F430.
The kit I am going to build is the one manufactured by Fujimi, in scale 1/24.
I'm not really a fan of Ferrari's in general, but I thought that this car had a nice flowing body-shape, without looking over the top like the Ferrari F40, F50 or Enzo. And also the price was nice, so that made the decision to purchase this kit also a bit easier.
Once the kit was purchased I also bought the Crazy Modeler photo-etch detail set (original release) for this kit.
Apart from this detailset I am not going to do much extra detailing. This will be my second car since a 15 year break from the hobby, so I thought taking it a bit easy would be a good start.
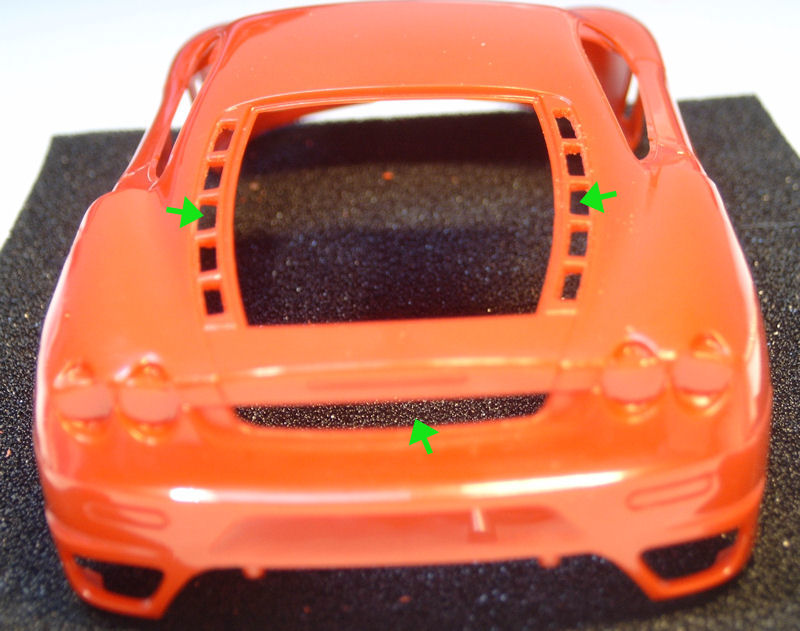
I started the model bij removing several of the moulded grilles, because I had etched versions in the CM PE set.
I used a pin vise with several different drills to open the grilles roughly. After that I continued with a hobby-knife to further open up the areas. And last step was smoothing the edges with sand-paper, before glueing in the PE parts.
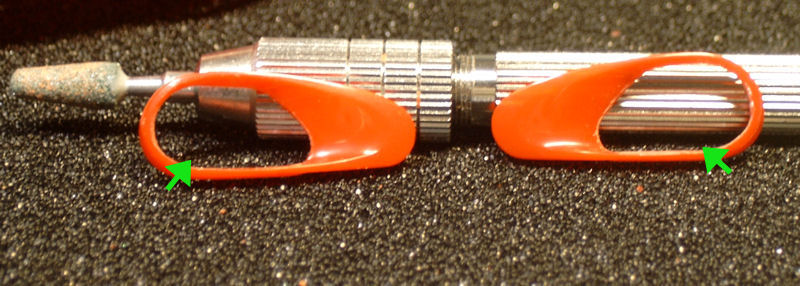
 For the final detailing of the front air intakes I used a grinding tool
from my Dremel in the pin vise. Worked great and I had full control,
which cannot be said when your having a 10.000 rpm Dremel in your
hands...
For the final detailing of the front air intakes I used a grinding tool
from my Dremel in the pin vise. Worked great and I had full control,
which cannot be said when your having a 10.000 rpm Dremel in your
hands...
After the parts were cleaned and the mold lines were removed from the body, I glued in the PE parts with CA glue.
After the glue had cured, I sprayed the body with Tamiya Grey Primer. I used my airbrush for this job because I feel that I cannot control the priming enough by using the original spray-can.
Therefore I decanted some of the primer in a jar and after thinning it a bit with Tamiya's Lacquer Thinner I airbrushed the primer onto the body in several thin layers.
I sanded the primer after each layer to remove the inevitable dust-particles and to remove the mould-lines I forgot before.
The following pictures where taken after I (lightly) sanded the first coat of primer.


In the meantime I had also started work on the engine bay. Or at least, what has to look like the engine bay. I don't really have much complaints about this kit. This is actually my first Fujimi kit and I'm very satisfied with the fitment of parts. But, the engine bay is very much simplified, which is a bit of a shame. Because of the large window on top of the engine bay, the engine is very visible.
Revell, which has also a Ferrari F430 kit for sale, has done better in that regard. But, as I said, it's only a minor "problem".
I'll just have to try and detail as much as possible in the engine bay, to make it look a bit better.
The following picture shows the current state of the engine compartment:
When I looked at my reference pictures I noticed that the intake plenum on top of the engine had some sort of casting structure.
A structure which wasn't visible in the kit part so I decided to try to create this structure myself.
At first I thought I would use some stuff that is called "Cast-a-coat". It consists of two parts; glue and powder.
At first you brush the glue onto the parts you want to have a casting texture. After that you gently pour the powder over the wet glue. The powder sticks to the glue and after the glue has dried you have a nice casting texture.
At least, that's what it says in the manual. However, I noticed that the glue is quite thin and so it was very difficult to keep the glue from going where I didn't want it.
So after this first, botched, attempt, I put the intake plenum into some brake-fluid to strip it of it's coat.
After some searching on Automotive Forums I found another technique to create casting texture. And this one worked.
The user on Automotive Forums wrote that he sprayed the paint with high(er) pressure from a greater distance so that the paint is already partially dried before it hits the part and thus creates a rough texture.
Something which normally happens when you don't need it, in my experience.
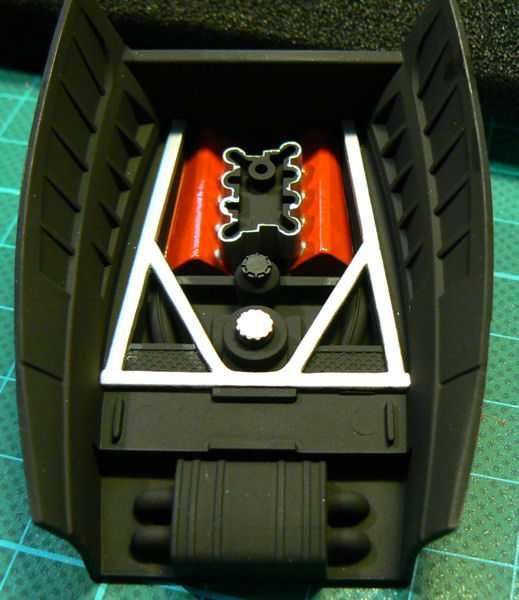
Suffice to say, I couldn't get it to work. Maybe I thinned the paint too much, I don't know. What did work for me though was to use very low pressure (0.6-0.7 bar) and to spray only a very small amount of paint.
And the result was this (which I'm very happy with, by the way):

After I finished the engine bay (well, apart from the detailing that is), I turned my attention to the brakes.
I was going to use the brakes from the PE-set. This was going to be a first for me, as I have never used PE parts before.
The brakes consist out of 6 etched pieces which must be glued together to create the brake-disks. The brake calipers had to be removed from the original brake disks that were in the kit.
I must say the the original brake disks were already very nice. But I figured, now that I have this PE-set, I sure am going to use it.
It took some time for me to get al the 6 brake pieces correctly aligned. As a matter of fact, my first attempt ended up inside a jar with acetone, to dissolve the CA glue. Let's just say, my first attempt was just that. An attempt.
By the second time I had figured out a way to get the pieces aligned, and keep them aligned, until the glue had cured enough.
And after I mated the brake disks with the original calipers, it looked like this:

In the meantime I had also started on the interior of the car.
I was planning to give the interior a kind of 'leather-look' tan colour. And to top it all off I bought some Soft-Flock fibers from Donjer to give the interior a bit of an extra dimension.
I had never used flocking before, so this was going to be a first for me too. But in the end it was a breeze to apply the flocking. Using the glue from Donjer, I brushed the glue (which dries transparent, luckily) onto the parts I wanted to 'flock'. And after that I 'poofed' the flocking material onto the glue with a squeezing bottle.
At first I thought "what the flock" (ha-ha-ha), but after I removed the excess fibers it looked absolutely perfect.
Take a look for yourself:


The floorplate of the car had already been finished by me. I had painted it with Tamiya X-18 semigloss black. And after the paint had cured I airbrushed some satin clear over the floorplate, to give it a bit of a nice even finish.
During the paintprocess of the floorplate I had also painted the suspension (or what has to look like a suspension, because it has been very much simplified). And now it was time to mount the finished suspension components, the brakes and the wheels to the floorplate.
Looks great (at least, that's my opinion):


In hindsight, I should have given the brake-discs a wash, to better display the drilled (actually etched) holes in the brake-discs.
Something I have to remember for my next build.
The kit I am going to build is the one manufactured by Fujimi, in scale 1/24.
I'm not really a fan of Ferrari's in general, but I thought that this car had a nice flowing body-shape, without looking over the top like the Ferrari F40, F50 or Enzo. And also the price was nice, so that made the decision to purchase this kit also a bit easier.
Once the kit was purchased I also bought the Crazy Modeler photo-etch detail set (original release) for this kit.
Apart from this detailset I am not going to do much extra detailing. This will be my second car since a 15 year break from the hobby, so I thought taking it a bit easy would be a good start.
I started the model bij removing several of the moulded grilles, because I had etched versions in the CM PE set.
I used a pin vise with several different drills to open the grilles roughly. After that I continued with a hobby-knife to further open up the areas. And last step was smoothing the edges with sand-paper, before glueing in the PE parts.
After the parts were cleaned and the mold lines were removed from the body, I glued in the PE parts with CA glue.
After the glue had cured, I sprayed the body with Tamiya Grey Primer. I used my airbrush for this job because I feel that I cannot control the priming enough by using the original spray-can.
Therefore I decanted some of the primer in a jar and after thinning it a bit with Tamiya's Lacquer Thinner I airbrushed the primer onto the body in several thin layers.
I sanded the primer after each layer to remove the inevitable dust-particles and to remove the mould-lines I forgot before.
The following pictures where taken after I (lightly) sanded the first coat of primer.
In the meantime I had also started work on the engine bay. Or at least, what has to look like the engine bay. I don't really have much complaints about this kit. This is actually my first Fujimi kit and I'm very satisfied with the fitment of parts. But, the engine bay is very much simplified, which is a bit of a shame. Because of the large window on top of the engine bay, the engine is very visible.
Revell, which has also a Ferrari F430 kit for sale, has done better in that regard. But, as I said, it's only a minor "problem".
I'll just have to try and detail as much as possible in the engine bay, to make it look a bit better.
The following picture shows the current state of the engine compartment:
When I looked at my reference pictures I noticed that the intake plenum on top of the engine had some sort of casting structure.
A structure which wasn't visible in the kit part so I decided to try to create this structure myself.
At first I thought I would use some stuff that is called "Cast-a-coat". It consists of two parts; glue and powder.
At first you brush the glue onto the parts you want to have a casting texture. After that you gently pour the powder over the wet glue. The powder sticks to the glue and after the glue has dried you have a nice casting texture.
At least, that's what it says in the manual. However, I noticed that the glue is quite thin and so it was very difficult to keep the glue from going where I didn't want it.
So after this first, botched, attempt, I put the intake plenum into some brake-fluid to strip it of it's coat.
After some searching on Automotive Forums I found another technique to create casting texture. And this one worked.
The user on Automotive Forums wrote that he sprayed the paint with high(er) pressure from a greater distance so that the paint is already partially dried before it hits the part and thus creates a rough texture.
Something which normally happens when you don't need it, in my experience.
Suffice to say, I couldn't get it to work. Maybe I thinned the paint too much, I don't know. What did work for me though was to use very low pressure (0.6-0.7 bar) and to spray only a very small amount of paint.
And the result was this (which I'm very happy with, by the way):
After I finished the engine bay (well, apart from the detailing that is), I turned my attention to the brakes.
I was going to use the brakes from the PE-set. This was going to be a first for me, as I have never used PE parts before.
The brakes consist out of 6 etched pieces which must be glued together to create the brake-disks. The brake calipers had to be removed from the original brake disks that were in the kit.
I must say the the original brake disks were already very nice. But I figured, now that I have this PE-set, I sure am going to use it.
It took some time for me to get al the 6 brake pieces correctly aligned. As a matter of fact, my first attempt ended up inside a jar with acetone, to dissolve the CA glue. Let's just say, my first attempt was just that. An attempt.
By the second time I had figured out a way to get the pieces aligned, and keep them aligned, until the glue had cured enough.
And after I mated the brake disks with the original calipers, it looked like this:
In the meantime I had also started on the interior of the car.
I was planning to give the interior a kind of 'leather-look' tan colour. And to top it all off I bought some Soft-Flock fibers from Donjer to give the interior a bit of an extra dimension.
I had never used flocking before, so this was going to be a first for me too. But in the end it was a breeze to apply the flocking. Using the glue from Donjer, I brushed the glue (which dries transparent, luckily) onto the parts I wanted to 'flock'. And after that I 'poofed' the flocking material onto the glue with a squeezing bottle.
At first I thought "what the flock" (ha-ha-ha), but after I removed the excess fibers it looked absolutely perfect.
Take a look for yourself:
The floorplate of the car had already been finished by me. I had painted it with Tamiya X-18 semigloss black. And after the paint had cured I airbrushed some satin clear over the floorplate, to give it a bit of a nice even finish.
During the paintprocess of the floorplate I had also painted the suspension (or what has to look like a suspension, because it has been very much simplified). And now it was time to mount the finished suspension components, the brakes and the wheels to the floorplate.
Looks great (at least, that's my opinion):
In hindsight, I should have given the brake-discs a wash, to better display the drilled (actually etched) holes in the brake-discs.
Something I have to remember for my next build.
Comments
Post a Comment