Preparing the body (once again)
As can be read at the top of this page, I wasn't happy with the way the colour of the car turned out (Tamiya TS-47).
After bathing for several weeks in brake-fluid, the paint just didn't want to come off. So I decided to help a bit. With the aid of an old (...) toothbrush and an even older scotch brite pad I managed to get most of the paint off.
The reluctant bits I attacked with a bit of sanding paper, and after I had washed the body in some lukewarm water with a bit of dish-washing soap, it looked like new again.
Well, sort of.
After this laborious process I decanted a bit of Tamiya White Primer into a jar (and spilling half the jar in the process), and sprayed the body with several layers of this primer.
Firstly, because I wanted an even white finish for the yellow to go onto, and secondly because it gave me a nice opportunity to see where I had to do some reworking...

 And reworking I had to do. Because I always intended to spray some
primer onto the body, I figured that it might be smart to deepen the
panel lines of the body a bit, to prevent them from filling up with
primer and/or paint.
And reworking I had to do. Because I always intended to spray some
primer onto the body, I figured that it might be smart to deepen the
panel lines of the body a bit, to prevent them from filling up with
primer and/or paint.
Sadly, it appeared that I don't have a very steady hand. Although I tried to be very careful, it happened once or twice that the scriber "got away", creating a new panel line where I didn't want it.
So out came the putty and the sand paper, to repair the damage I had done.
 Decisions, decisions
Now that the body is prepared and ready to receive some new colour, I faced the unpleasant task of choosing which colour to use (or is that try) next.
The contestants are : Revell Aqua Color Yellow, Tamiya X-8 Lemon Yellow, and Tamiya TS-47 Chrome Yellow.
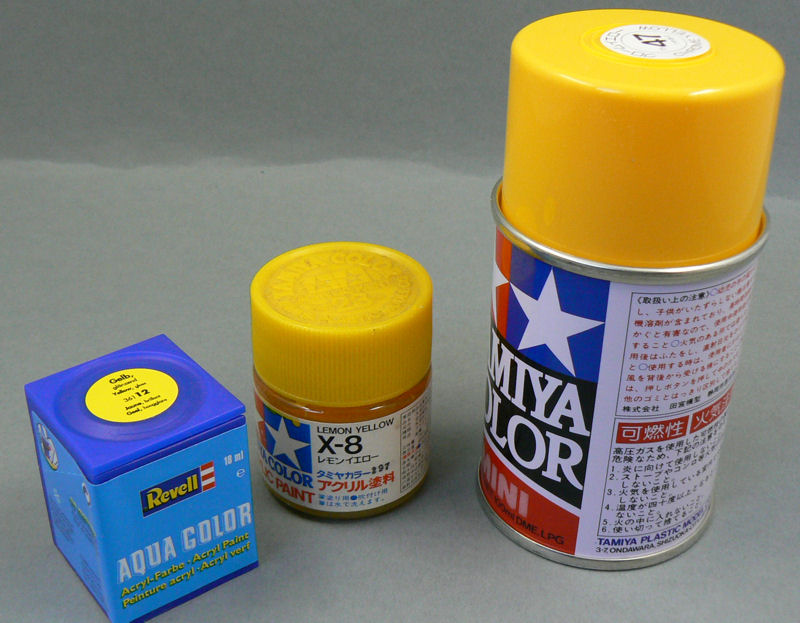 At least I knew which colour I wouldn't choose. Remained the choice between Revell and Tamiya X-8.
I've decided to try my hand at X-8 and in the next update you'll read whether that was the right choice or not.
Apart from preparing the body, I also finished the brakes.
 And I did some mass painting of semigloss black parts.
I painted the parts with Revell Aqua Color semigloss black. And I must say, I really love that colour. All colours from the Revell Aqua Color range, as a matter of fact.
They don't smell, they cover perfectly and very smooth, and even if you try to botch up, it turns out great. Highly recommended.
Right, after that commercial break, a nice picture of the parts (with some product placement added as a bonus).
 That's it for this update.
See you next time !
As can be read at the top of this page, I wasn't happy with the way the colour of the car turned out (Tamiya TS-47).
After bathing for several weeks in brake-fluid, the paint just didn't want to come off. So I decided to help a bit. With the aid of an old (...) toothbrush and an even older scotch brite pad I managed to get most of the paint off.
The reluctant bits I attacked with a bit of sanding paper, and after I had washed the body in some lukewarm water with a bit of dish-washing soap, it looked like new again.
Well, sort of.
After this laborious process I decanted a bit of Tamiya White Primer into a jar (and spilling half the jar in the process), and sprayed the body with several layers of this primer.
Firstly, because I wanted an even white finish for the yellow to go onto, and secondly because it gave me a nice opportunity to see where I had to do some reworking...
Sadly, it appeared that I don't have a very steady hand. Although I tried to be very careful, it happened once or twice that the scriber "got away", creating a new panel line where I didn't want it.
So out came the putty and the sand paper, to repair the damage I had done.
Now that the body is prepared and ready to receive some new colour, I faced the unpleasant task of choosing which colour to use (or is that try) next.
The contestants are : Revell Aqua Color Yellow, Tamiya X-8 Lemon Yellow, and Tamiya TS-47 Chrome Yellow.
I've decided to try my hand at X-8 and in the next update you'll read whether that was the right choice or not.
Apart from preparing the body, I also finished the brakes.
I painted the parts with Revell Aqua Color semigloss black. And I must say, I really love that colour. All colours from the Revell Aqua Color range, as a matter of fact.
They don't smell, they cover perfectly and very smooth, and even if you try to botch up, it turns out great. Highly recommended.
Right, after that commercial break, a nice picture of the parts (with some product placement added as a bonus).
See you next time !
Comments
Post a Comment