In the previous post I already mentioned that the moulds had seen better days as this is quite an old kit (original moulds seem to be from 2000/2001).
A direct result of the age of the moulds is the fact that the kit is based on the early version of the C5-R, more precisely on chassis no.'s C5R-001 to C5R-004.
The version of the car that can be build from this kit is the Le Mans 2003 version, being either chassis no. C5R-008 or C5R-009.
I found a lot of useful information on the C5-R on the this site.
I tried to highlight some (but not all) differences between the different versions of the C5-R below.
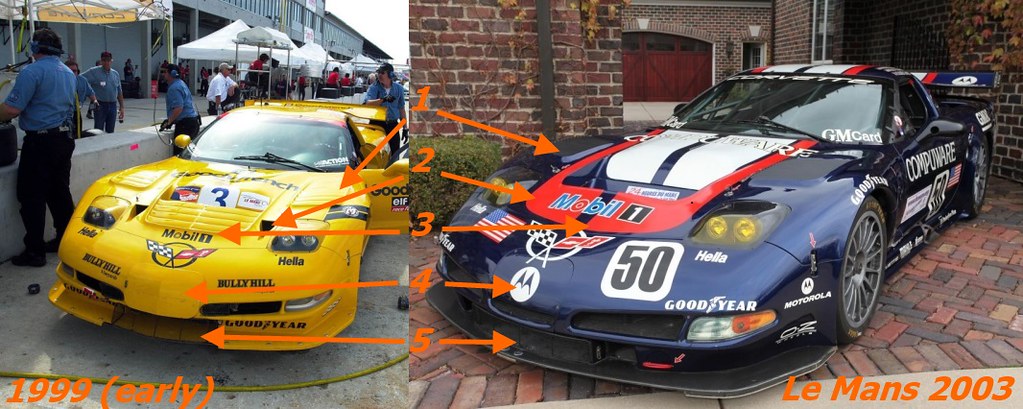
As can be seen are there quite a few challenges ahead if you want to build your Corvette as it raced at the 2003 Le Mans event.
I will try to rectify the most obvious differences, but won't be taking on all of them.
My original list of modifications was looking like this:
I started with the floor of the car.
Several fasteners which are present on the model but aren't on the LM 2003 car have been removed.
I also removed some Revell copyright information from the floor. For some reason Revelle decided to mould this into the underside of the car... Why not to the inside where it isn't so obvious...?
The diffusor will also be taken care of. Or at least made optically a bit more to scale... I'll probably be thinning the verticale fins of the diffusor a bit.

When dryfitting the body to the floor I noticed that the body was slightly deformed.
I'll be tending to solving the differences first befor I'll try to straighten the body.

This is how the body looks now. As you can see, there's still a lot of work to do.

In the meantime I've also been removing and cleaning up parts from the sprues and were appropriate already glued smaller sub assemblies together.
Sadly I had to conclude that the quality of this particular kit isn't exactly Tamiya-like.
The fitment of parts isn't the best. Quite a few gaps remain and certain parts seem to have become a victim of badly aligned mould-halves.
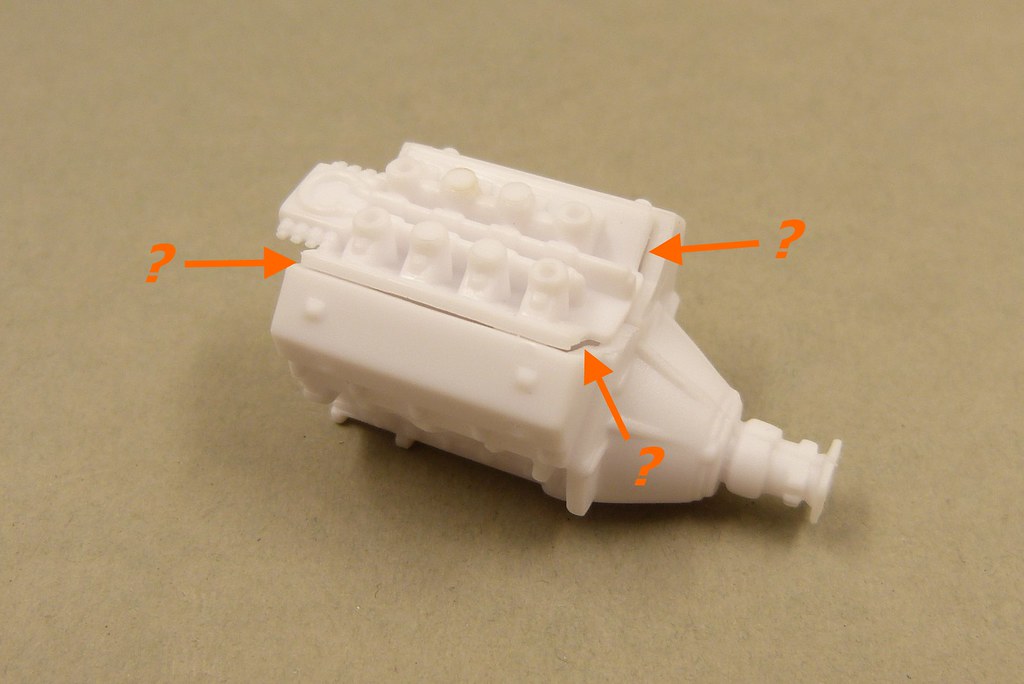
Most parts will, luckily, be tucked away under the body, so it isn't the biggest of problems.
End of part 2.
A direct result of the age of the moulds is the fact that the kit is based on the early version of the C5-R, more precisely on chassis no.'s C5R-001 to C5R-004.
The version of the car that can be build from this kit is the Le Mans 2003 version, being either chassis no. C5R-008 or C5R-009.
I found a lot of useful information on the C5-R on the this site.
I tried to highlight some (but not all) differences between the different versions of the C5-R below.
As can be seen are there quite a few challenges ahead if you want to build your Corvette as it raced at the 2003 Le Mans event.
I will try to rectify the most obvious differences, but won't be taking on all of them.
My original list of modifications was looking like this:
- close the naca ducts (2).
- removing the louvres of the radiator outlet (3).
- increasing the radiator outlet opening (3).
- edit radiator inlet (5).
- increase radiator inlet opening (5).
- additional cooling inlet beneath night lights (4).
- removing inscription + minor details from the floor.
I started with the floor of the car.
Several fasteners which are present on the model but aren't on the LM 2003 car have been removed.
I also removed some Revell copyright information from the floor. For some reason Revelle decided to mould this into the underside of the car... Why not to the inside where it isn't so obvious...?
The diffusor will also be taken care of. Or at least made optically a bit more to scale... I'll probably be thinning the verticale fins of the diffusor a bit.
When dryfitting the body to the floor I noticed that the body was slightly deformed.
I'll be tending to solving the differences first befor I'll try to straighten the body.
This is how the body looks now. As you can see, there's still a lot of work to do.
In the meantime I've also been removing and cleaning up parts from the sprues and were appropriate already glued smaller sub assemblies together.
Sadly I had to conclude that the quality of this particular kit isn't exactly Tamiya-like.
The fitment of parts isn't the best. Quite a few gaps remain and certain parts seem to have become a victim of badly aligned mould-halves.
Most parts will, luckily, be tucked away under the body, so it isn't the biggest of problems.
End of part 2.
Comments
Post a Comment